|
Medical Imaging Interaction Toolkit
2024.12.99-d991a09f
Medical Imaging Interaction Toolkit
|
|
Medical Imaging Interaction Toolkit
2024.12.99-d991a09f
Medical Imaging Interaction Toolkit
|

This page is intended to give a comprehensive guide to setting up your own MITK based project. It will use the application framework provided by MITK and is probably the preferred way for most users.
The first part of this document is a tutorial aimed at newcomers to MITK and possibly CMake and tries to give as much help as possible on setting up your own project. If you are looking for more technical information about customizing MITK, the structure of the superbuild or packaging you might want to read the Information for advanced users.
If you have set up your MITK project already and want to start developing you could take a look at The MITK Tutorial.
Use the MITK project template as an example-based project template.
What ever option you choose, a MITK-based project needs essentially the same prerequisites as MITK itself. Please see Prerequisites for details.
In order to start developing with MITK, you first have to set up the source directory for your project.
Download the project as a tarball or zipball and extract it to your desired source directory.
After you have set up your source directory you can proceed to generate your binary directory using CMake. Depending on your operating system and preferences you might want to use "cmake-gui" or "ccmake" (shell). This document assumes you are using cmake-gui.
Now you are ready to compile your code. Depending on your choice of tool this will be done differently, we cover two possibilities here.
We assume your application is called "AwesomeApp" and your project "AwesomeProject" and your binary directory is "D:/AwesomeProject-superbuild/". Replace names and paths accordingly.
it is not available
Due to the sheer number of MITK plugins not every plugin is activated by default. To activate a specific plugin (again replace paths as needed):
You can either inject an already build MITK to be used by your project or configure some MITK options directly in your project's superbuild configuration if MITK is going to be build inside your project.
By setting the EXTERNAL_MITK_DIR variable in your project's superbuild CMake configuration to a MITK build directory (containing the MITKConfig.cmake) you can skip the MITK build process.
If MITK is the only external project in your project, you might want to disable the superbuild of your project completely (set <your-proj-name>_USE_SUPERBUILD to OFF or edit your CMakeLists.txt file to set it to OFF by default) and set the MITK_DIR CMake variable to your MITK build directory.
If MITK is being build inside your project's superbuild process, you can enable the use of certain third-party libraries inside of MITK. The following variables control the MITK configuration:
You can also inject already build third-party libraries from inside your project's superbuild in the MITK superbuild by using any of the following CMake variables:
If the corresponding MITK_USE_<proj> option is set to on, the MITK superbuild will use the provided build directory instead of building the project itself.
You can also control the source code location for MITK in your project's superbuild configuration by using the following CMake variables:
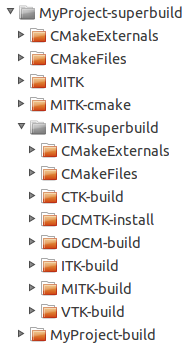
If you are using the superbuild feature of the generated project (the default), you might want to familiarise yourself with the layout of your build tree. The top-level build directory which you specified in CMake when configuring your project will contain all the required dependencies.
Suppose we call our project MyProject and the build directory is "C:\MyProject-superbuild". Then the layout looks something like this:
MyProjectLayout.png The top-level directory contains the source code and the build directories from the dependencies of your project. In the current case, the only dependency of MyProject is MITK, which in turn has downloaded and built its own dependencies (CTK, DCMTK, ITK, etc.). The "real" build tree for your project is located in MyProject-superbuild/MyProject-build, so point the CMake-GUI to this build directory if you want to change the set of enabled plug-ins for example.
Further, you should open the MyProject.sln solution file (for Visual Studio) or execute "make" in the MyProject-superbuild/MyProject-build/ directory. Only for the very first time or if you want to update and newly build the project's dependencies should you use the project files in the MyProject-superbuild directory directly.
The same applies for the MyProject-superbuild/MITK-superbuild directory. This directory contains the MITK superbuild, nested inside your project's superbuild. If you want to change CMake options for MITK, use the MyProject-superbuild/MITK-superbuild/MITK-build build directory.
You can create deployable packages of your project for all supported operating systems my building the PACKAGE target. On Linux, this will create a tarball, on MacOS a .dmg file, and on Windows a zipball and an NSIS installer (if NSIS is installed and found).
You can read more about deployment here.
 1.8.17
