
Icon of the MatchPoint Image Mapper
Introduction
This view offers the possibility to map any image or point set in the data manager using a user selected registration object. Using the Mapper to map images the user can control the field of view (image geometry) the image should be mapped into, as well as interpolation strategy that should be used.
It is one of several MatchPoint registration plugins.
Typical usage scenarios
- You have registered image I1 onto image I2. Now you want to transfer the segmentation of I1 to I2 in order to evaluate I2 within this mapped segmentation using The Image Statistics View .
- You have registered image I1 onto image I2. Now you want to map I3 (e.g. an other MRI sequence of the same session) also onto I2 with the same registration.
- You have registered image I1 onto image I2. Now you want to map a segmentation done on I1 also onto I2 with the same registration.
- You have registered image I1 onto image I2. Now you want to map a point set of image I1 also onto I2 with the same registration.
Contact information
This plug-in is being developed by the SIDT group (Software development for Integrated Diagnostics and Therapy) at the DKFZ (German Cancer Research Center). If you have any questions, need support, find a bug or have a feature request, feel free to contact us at dipp@.nosp@m.dkfz.nosp@m..de.
Usage
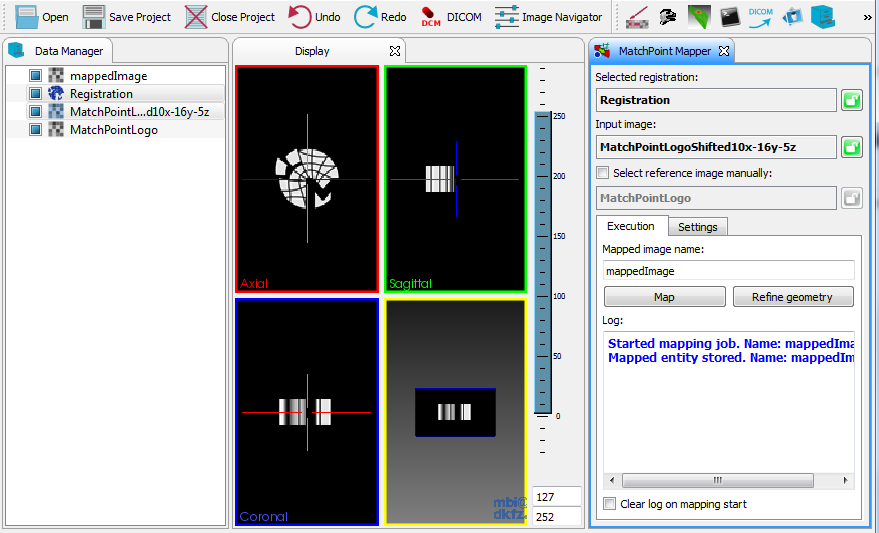
Example screenshot showing the Mapper plugin in use.
To use the mapper at least an input data (image or point set) must be selected. Additionally you may select a registration object and a reference image. Registration objects are marked with a small blue icon (e.g. the data "Registration" in the data manager of the screen shot above). The Reference image defines the geometry (field of view, orientation, spacing) that should be used for the result image. By default the view will try to automatically determine the reference image (by default it is the target image of the selected registration). If auto selection cannot determine the reference it will choose the input image as reference. The reference image can be also defined by the user explicitly by activating manual selection.
REMARK: If you map point sets you can ignore the reference image slot. It has no affect.
You can multiselect registration and data (press the CTRL-key while selecting the nodes in the data manager). The Mapper will automatically sort the selections in the correct "slots" of the view.
REMARK: The mapping results will be added as child nodes to the used input node.
REMARK: If you do not select an registration the view will assume that you make an identity transform. This is a convinient way if you just want to resample an image into the geometry of an other image (when no registration is needed). Also in this use case you can take adventage of the different interpolation and sub/super sampling strategies.
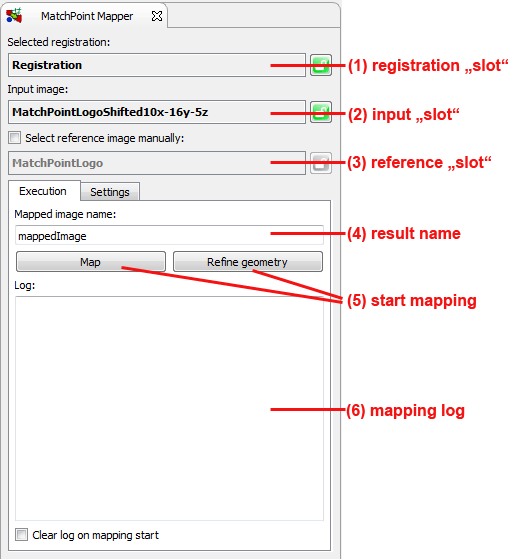
Details of the mapper view.
(1) The currently selected registration, that will be used for mapping.
(2) The currently selected input data, that will be mapped.
(3) The currently (automatically or by user) selected reference image, that defines the geometry of the result.
(4) The name of the result data in the data manger.
(5) The start button(s) to commence the mapping process. For details regarding the two options see
Mapping or geometry refinement.
(6) Log windows with messages regarding the mapping process.
Every "slot" has the ability to be locked. If locked the last selection will be kept, regardless the current selection in the data manager. You can use this for example to lock the registration, if you want to map multiple images. Doing so it is enough to just select the next image in the data manager. To lock a slot, click at the "lock" button at the right side (see example images below).

Unlocked slot/node (default state). Changes with the selections in the data manager.
{ node-locked.png, "Locked slot/node. Stays, regardless the selections in the data manager.",6}
Mapping or geometry refinement
The mapper view offers two options to map images:
- "Map" (default)
- "Refine geometry" For images "Map" fills the pixels of the output image by interpolating input image pixels using the registration object. This option always works. But may take longer and introduces interpolation errors, because a new image is resampled.
The second option "Refine geometry" is only offered, if the registration (more precise its inverse kernel) is matrix based and the selected data is an image. In this case it just clones the image and refines the image geometry (origin, orientation, ...); thus no interpolation artefacts are introduced.
Settings
If you map the image (and not just refine the geometry), you have several settings available:
- "Allow undefined pixels": Activate to handle pixels of the result image that are not in the field of view of the input image. This pixel will get the "padding value".
- "Allow error pixels": Activate to handle pixels of the result image that can not be mapped because the registration does not support this part of the output image. This pixel will get the "error value".
- "Interpolator": Set to choose the interpolation strategy that should be used for mapping.
- "Activate super/sub sampling": Activate if you want to use origin and orientation of the reference image but want to alter the spacing.
Interpolation
You can choose from the following interpolation strategies:
- "nearest neighbour": Use the value of the nearest pixel. Fastest, but high interpolation errors for gray value images. Right choice for label images or masks.
- "Linear": Fast linear interpolation with often sufficient quality. Tends to blur edges.
- "BSpline (3rd order)": Good trade off between time and quality.
- "Windowed Sinc (Hamming)": Good interpolation quality but very time consuming.
- "Windowed Sinc (Welch)": Good interpolation quality but very time consuming.
Handling of masks/segmentations
If you select an mask as input image, the plugin will be automatically reconfigured to settings that are suitable for the task of mapping masks. Most importantly the interpolator will be set to "nearest neighbour".

 1.8.9.1
