|
Medical Imaging Interaction Toolkit
2016.11.0
Medical Imaging Interaction Toolkit
|
|
Medical Imaging Interaction Toolkit
2016.11.0
Medical Imaging Interaction Toolkit
|
The Ultrasound Module provides a microservice based API for ultrasound devices. The main features are:
This module requires OpenCV to be enabled in the superbuild options via CMake. Its functionality is made available to the user via the UltrasoundSupport plugin
Documentation on how to use Telemed API devices can be found on Controlling API Devices of Telemed.
Ultrasound Devices are managed in a simple hierarchy:
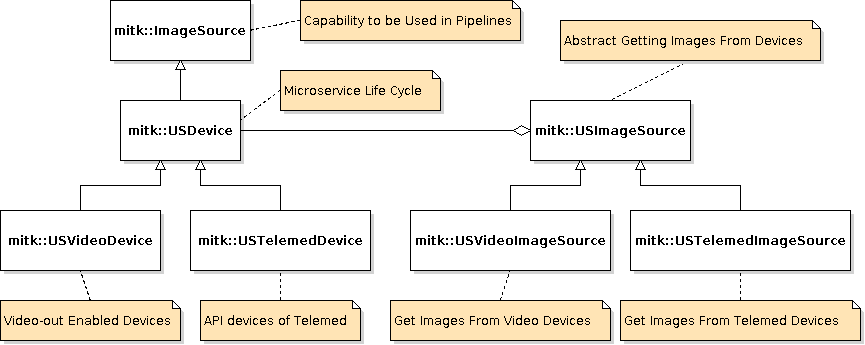
Each mitk::USDevice follows a life cycle handling the availabilty as a micro service and the connection to the hardware:

For changing the states corresponding methods are available in mitk::USDevice: mitk::USDevice::Initialize() for initialization, mitk::USDevice::Connect() for connecting, mitk::USDevice::Disconnect() for disconnecting and so on. For example, once an object of mitk::USDevice is constructed it can be made available as a micro service via a call to mitk::USDevice::Initialize(). The state changes to Initialized then and the device is available to other modules or plugins (UltrasoundSupport, QmitkUSDeviceManagerWidget) through the micro service framework.
The methods for changing the states should not be overwritten by sublcasses. Instead mitk::USDevice::OnInitialization(), mitk::USDevice::OnConnection() and so on can be overwritten for handling everything that has to be done on the corresponding state change.
When the mitk::USDevice object was created at first it is available just locally. An initialized device is available as a micro service, but not connected to the real hardware. A connected device is connected to the hardware, but no acquiring images. Finally, an activated device is acquiring images from the ultrasound hardware.
Capabilities of API-based ultrasound devices are available through control interfaces which are shown below:
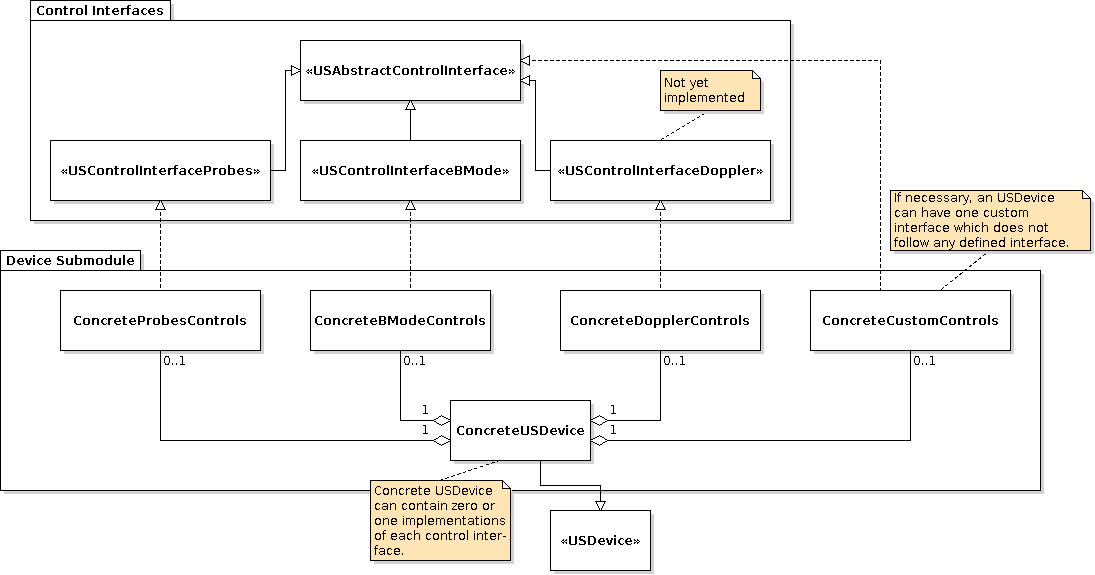
The control interfaces mitk::USControlInterfaceProbes and mitk::USControlInterfaceBMode are available, while mitk::USControlInterfaceDoppler is empty at the moment. Every sublcass of mitk::USDevice can use an implementation of each of these interfaces, but this is not necessary. The mitk::USVideoDevice for example uses a custom control interface only (mitk::USVideoDeviceCustomControls), which is a subclass of mitk::USAbstractControlInterface. The mitk::USTelemedDevice uses mitk::USTelemedBModeControls for handling the ultrasound b mode and mitk::USTelemedProbesControls for handling the connected ultrasound probe.
Each custom control interface needs its own Widget (subclassed of QmitkUSAbstractCustomWidget), if it should be possible to control its functionality by using the UltrasoundSupport plugin. For the standard interfaces mitk::USControlInterfaceProbes, mitk::USControlInterfaceBMode and mitk::USControlInterfaceDoppler there are Widgets available in the USUI module (QmitkUSControlsProbesWidget, QmitkUSControlsBModeWidget, QmitkUSControlsDopplerWidget) which can be used by plugins. For each Widget an object of the corresponding control interface must be set on its constructor call. A class diagram showing how the Widgets are connected to the control interfaces can be seen below:
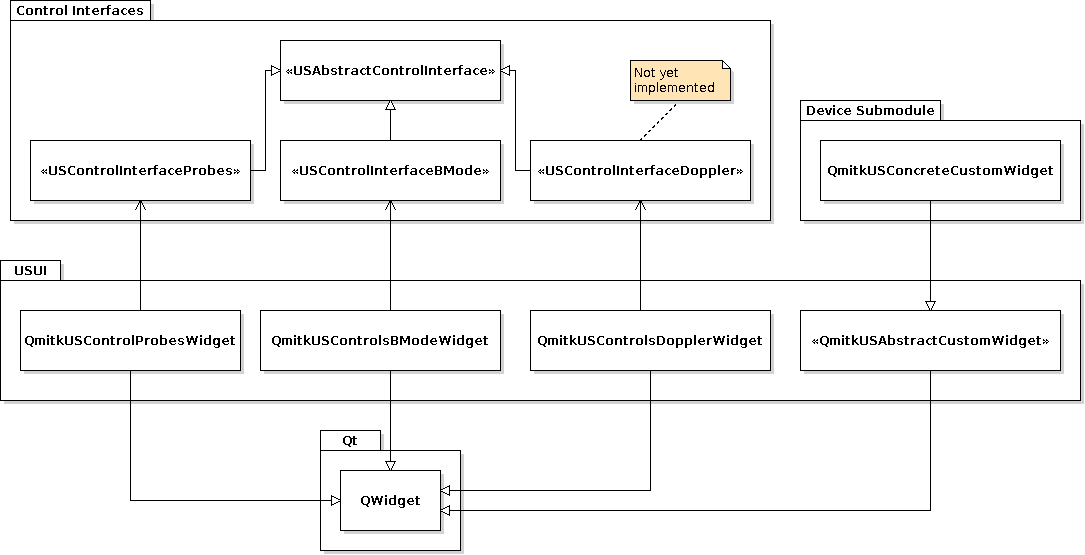
A plugin can use the Widgets by creating a new object of the Widget and setting the corresponding interface object of the mitk::USDevice which should be controlled. How to use custom widgets is described in the class documentation of QmitkUSAbstractCustomWidget.
There are some Widgets available in the USUI module that can be used for plugin development: a device management Widget, a Widget for creating new mitk::USVideoDevice objects and widgets for the control interfaces of API device. The usage of the Widgets is described in more detail in the UltrasoundSupport Plugin Documentation.
The QmitkUSDeviceManagerWidget can view every connected mitk::USDevice and allows the user to activate and deactivate devices. Additionally mitk::USVideoDevice can be created using the QmitkUSNewVideoDeviceWidget and removed by a corresponding button.
The QmitkUSNewVideoDeviceWidget allows the user to configure a frame grabber or other video input as a mitk::USVideoDevice.
There exists several widgets for controling ultrasound devices: QmitkUSControlsBModeWidget, QmitkUSControlsProbesWidget, QmitkUSControlsCustomVideoDeviceWidget. Own custom control widgets can be added by subclassing the available QmitkUSAbstractCustomWidget.
 1.8.9.1
