Table of Contents
Introduction
This view offers the possibility to manually manipulate a registration to establish a good mapping between data. The effect of manipulation is visualized with two user defined images to allow for visual inspection.
It is one of several MatchPoint registration plug-ins.
Usage
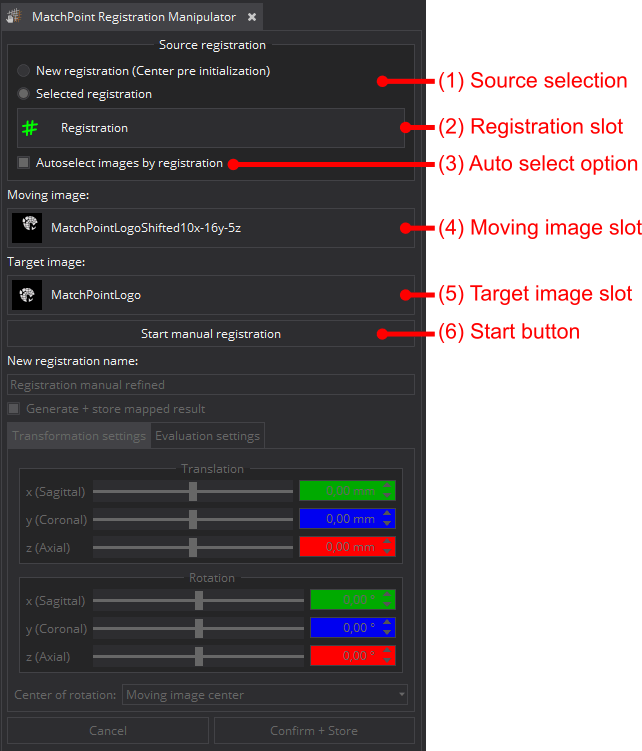
The typical workflow with the manipulator has following steps/sections:
(1) Source selection: You can choose between starting a new registration and using a selected registration. For latter option, the registration must be selected (see (2)).
- Remarks
- If you choose a new registration, the manipulator will automatically pre initialize this new transform to align the centers of the used images and therefore starts with sensible settings.
- If you choose an existing registration, the registration will not be altered. It serves as template/baseline for the manipulation, which will be "on top" of the existing registration.
(2) Registration slot: Shows the currently selected registration that serves as baseline. Only active if (1) is selected appropriately. Click to change.
(3) Auto select option: If active the view will try to deduce and automatically select (if loaded in the application) the moving and target image when the baseline registration changes. The view assumes that the moving and target images used to determine the registration should be used to illustrate the effects of the manipulation.
(4) Moving image slot: To allow for visual inspection of the manipulation a moving image must be specified. This image is mapped by the manipulated registration to illustrate the effects of the manipulation. Click to change the image.
(5) Target image slot: To allow for visual inspection of the manipulation a target image must be specified. This image is used to compare against the mapped moving image to illustrate the effects of the manipulation. Click to change the image.
(6) Start manual registration: If all settings are valid, you can start the manipulation. The render windows will automatically switch to the visual inspection mode and will be reinitialized once to the field of view of the target image.
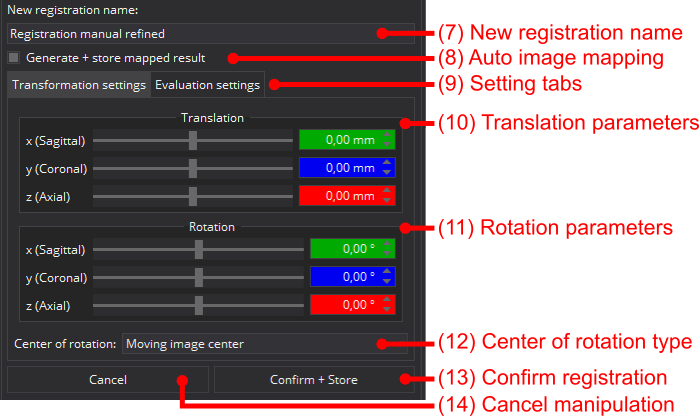
(7) Setting tabs: The lower part of the view groups the controls into two tabs: Transformation settings for adjusting the registration transform (Transformation settings) and Evaluation settings for the visual inspection rendering (Evaluation settings).
(8) Translation parameters: You can alter the translation parameter of the transform by using the sliders or the spinboxes. For more details see transform settings section (Transformation settings).
(9) Rotation parameters: You can alter the rotation parameter of the transform by using the sliders or the spinboxes. For more details see transform settings section (Transformation settings).
(10) Center of rotation type: You may choose the center of rotation for your manipulation. For more details see transform settings section (Transformation settings).
(11) Moving center correction: Press Translate moving center to navigator for a one-click rough pre-alignment that shifts the moving image so its center maps to the current crosshair/navigator position; only the translation component of the transform is changed. See Quick alignment: translate moving center to navigator for details.
(12) Mouse interactions on/off: Toggle the mouse-based manipulation tool on or off. When active, you can manipulate the registration directly in the 2D render windows via modifier+drag gestures. See Mouse-based interaction for details.
(13) New registration name: You may choose to give the resulting registration a special name.
(14) Auto mapping/refinement: Convenience options that are applied when the registration is confirmed:
- Generate + store mapped result: maps the moving image with the confirmed registration and stores the resulting image in the data storage.
- Refine geometry + store result: stores a copy of the moving image whose geometry is updated by the confirmed registration. The image data is not resampled, only the spatial geometry is composed with the transform. Only effective when the resulting registration is affine (always the case in this view, where the manipulator produces a rigid Euler transform); otherwise an error is reported on confirmation.
(15) Confirm registration: You may confirm the determined registration and store it in the data storage with the given name. The manipulation session will be automatically closed.
(16) Cancel manipulation: You may cancel the session any time. No changes will be stored and the manipulation session will be automatically closed.
Transformation settings
You can alter the translation and the rotation of the transform. In addition you may choose the center of rotation type. You have the following options:
- Moving image center: Rotate around the center of the moving image.
- World origin: Rotate around (0.0,0.0,0.0), the world origin.
- Current navigator position: Rotate around the current navigator position in the render views.
- Remarks
- FAQ: Why are the translation values "jumping" when I change the center mode or when I am rotating?
The reason is the relation between center, rotation, and translation.
A transformation is defined as x' = R (x - C) + C + T
where x': transformed point; x: point to transform; R: rotation matrix; C: center point; T: translation vector.
The offset of a transform is defined as O = -RC + C + T
The offset as well as the rotation matrix stay constant if the center point changes, therefore the translation has to be altered.
- Note
- To ease the orientation, the edit fields have background colors which resemble the colors of the plane the changes will "happen".
For translation, the translation vector will be parallel to the indicated plane (The image slides "over" the plane). For rotation, the rotation axis will be perpendicular to the indicated plane.
Center of rotation indicator
A yellow diamond-shaped indicator is displayed in the 2D render windows to mark the exact center of rotation. This helps you keep track of the pivot point while manipulating the registration, especially after the image has been translated or rotated away from its original position. The indicator size scales automatically with the moving image extent so it remains visible without dominating small fields of view.
Quick alignment: translate moving center to navigator
The Translate moving center to navigator button provides a fast way to achieve a rough pre-alignment when the misregistration between moving and target image is very large. Pressing the button computes a pure translation that moves the center of the moving image to the current crosshair/navigator position in the render windows. The rotation component of the current transform is fully preserved; only the translation changes.
Typical use:
- Navigate the crosshair in the target image to a recognizable anatomical landmark.
- Press Translate moving center to navigator to shift the moving image so its center overlaps that landmark.
- Fine-tune the alignment using the sliders, spinboxes, or the mouse interaction tool (Mouse-based interaction).
Mouse-based interaction
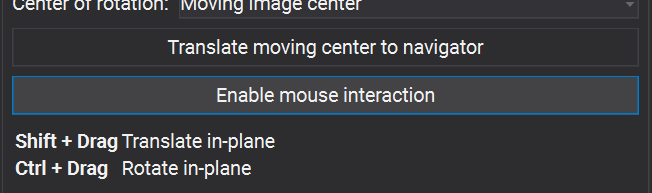
In addition to the sliders and spinboxes, you can manipulate the registration directly in the 2D render windows using the mouse. This is particularly useful for large, coarse adjustments where dragging feels more natural than editing numerical values.
Enabling the tool: Press the Enable mouse interaction toggle button on the Transformation settings tab to activate the tool. The cursor changes to indicate that the tool is active. Press the button again to deactivate it and restore the standard navigation behaviour.
Gesture mapping:
| Gesture | Effect |
|---|---|
| Shift + Drag | Translate the moving image in the current view plane |
| Ctrl + Drag | Rotate the moving image around the current center of rotation, within the current view plane |
| Left click (no modifier) | Move the navigator/crosshair to the clicked position |
- Remarks
- All drag gestures act relative to the plane of the render window in which you drag. Working in different 2D views therefore lets you constrain the manipulation to the desired anatomical plane.
- The plain left-click gesture is convenient when the Current navigator position center mode is active: clicking sets the pivot for the next rotation in a single step, without having to leave the interaction tool.
- The center of rotation used for Ctrl + Drag is exactly the one selected in the Center of rotation combo box. The yellow diamond-shaped indicator (Center of rotation indicator) always shows the current pivot point in the render windows, regardless of which center mode is active.
3D preview
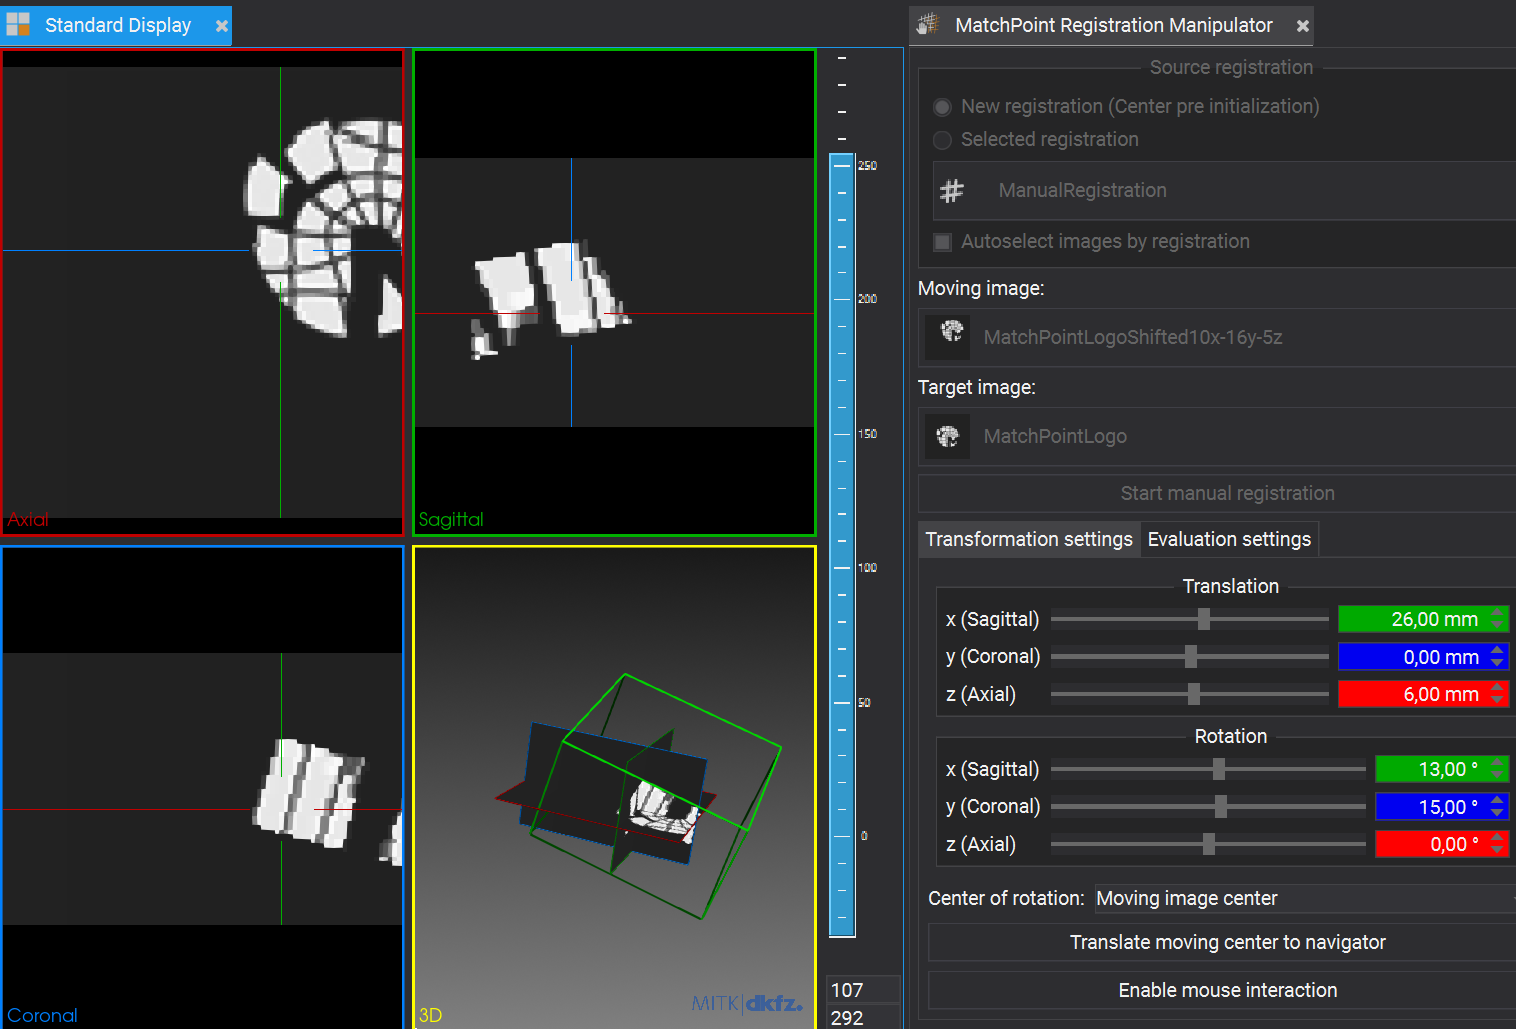
The Show 3D preview checkbox on the Evaluation settings tab enables a live 3D preview of the moving image's current registered position. When active, two additional helper objects appear in the 3D render window:
- A semi-transparent clone of the moving image rendered at the position defined by the current registration transform, so you can see how the volume is spatially positioned relative to the target.
- A green wireframe bounding box that outlines the moving image's transformed extent, making the spatial relationship visible even when the image content itself is not well-contrasted in 3D.
Both objects update continuously as you change the transform, giving immediate spatial feedback in 3D while you work in the 2D views.
- Remarks
- The preview objects require additional memory because the moving image data is cloned. For large volumes, consider activating the preview only when needed.
- The preview objects are automatically removed when the session is cancelled or confirmed.
Evaluation settings
The settings you can choose are equal to the settings of the evaluation view (The MatchPoint Registration Evaluation View). Please see the documentation of the MatchPoint Registration Evaluator view for more details.