Table of Contents
Introduction
The Datamanager is the central component to manage medical data like images, segmentation masks, registrations, surfaces, point sets, annotations, measurements, etc..
After loading data into the Datamanager the data is shown in the four-view window, the so-called Standard Display. The user can now start working on the data by interacting with the data inside the Standard Display, by using the MITK-plugins such as Segmentation or Basic Image Processing or by using the context menu inside the data manager.
Loading Data
There are several ways of loading data into the Datamanager as so-called data nodes:
- drag and drop data (e.g. from a file explorer or desktop) into the Datamanager
- drag and drop data (e.g. from a file explorer or desktop) into one of the four windows of the Standard Display
- use the keyboard shortcut Ctrl + o
- use the Open File Button in the left upper corner and use the Open Dialog
- use File -> Open File... from the top menu
A lot of file-formats can be loaded into MITK, for example:
- 2D-images / 3D-volumes with or without several time steps (*.dcm, *.ima, *.nrrd, ...)
- Surfaces (*.stl, *.vtk, ...)
- Point sets (*.mps)
- and many more
The user can also load a series of 2D images (e.g. image001.png, image002.png ...) to a MITK 3D volume. To do this, just drag and drop one of those 2D data files into the Datamanager by holding the ALT key. Note: What really happens is that the data nodes are stored inside a "Data storage" and the Datamanager is just a visual representation of the data inside the "Data storage". That's why the documentation sometimes uses the term "Data storage" instead of "Datamanager".
Saving Data
There are several ways of saving data from the Datamanager:
- use the keyboard shortcut Ctrl + s on a single data node
- use the keyboard shortcut Ctrl + s on multiple data nodes
- use the context menu right-click -> Save on a single data node
- use the context menu right-click -> Save on multiple data nodes
- use File -> Save... from the top menu on a single data node
- use File -> Save... from the top menu on multiple data nodes
Working with the Datamanager
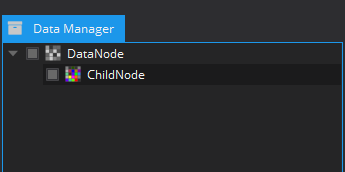
After loading data into the Datamanager the data appears as data nodes in a sorted list inside the Datamanager. The user can change the order of the data nodes manually by dragging one or multiple data nodes and dropping them at any position inside the Datamanager. Data nodes can also be sorted hierarchically as a parent-child-relation. For example after using the Segmentation-Plugin to create a segmentation on DataNode, the result is created as ChildNode, which is a child of DataNode (see Parent-Child-Relation screenshot).
A parent-child-relation can be changed by dragging a child of a data node and dropping it onto another data node. For this the Property Allow changing of parent nodes needs to be enabled (see Preferences).

Visibility of data nodes
By default all loaded data nodes are visible in the Standard Display. The visibility is indicated by the checkbox in front of the data node name in the Datamanager. If a data node is visible, the checkbox is filled - an empty checkbox indicates a hidden data node (see Parent-Child-Relation screenshot). Hint: The data nodes are rendered on top of each other, such that the topmost visible data node is always displayed on top of other data nodes. By hiding the topmost visible data node the next data node becomes the topmost visible data node and the hidden data node is not rendered anymore. Note: "Visible" does not mean that the node is correctly displayed inside the render windows. The user might have to re-initialize a data node to have it correctly displayed.
Selection of data nodes
Some MITK-plugins contain widgets to control the data nodes that are used for plugin-specific data processing. These widgets can be configured such that they listen to the current selection of the Datamanager. Having such a plugin active each selection change of data nodes inside the data manager will change the respective selection of the plugin. The data node selection widgets can have specific node predicates, which means that only specific data nodes can be controlled by the widgets. It might happen that a selected data node will not be represented in such a selection widget or that the selection widget will be emptied.
Renaming data nodes
There are two ways of changing the name of a data node inside the Datamanager:
- use the F2 key on a single data node
- double-click on a single data node
In both cases the new name can be accepted by hitting Enter or by clicking somewhere else.
Context Menu
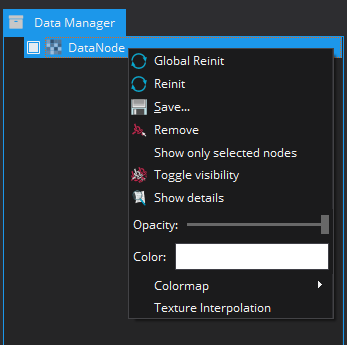
The Datamanager provides a context menu for each data node that can be opened by right-clicking on a data node. An example of the context-menu can be seen in the Context menu screenshot. The context menu allows to quickly perform common actions on data nodes. These actions differ according to the data type. Some of these actions are described here. For more actions see the respective modules and plugins (e.g. QmitkCreatePolygonModelAction inside the org_mitk_gui_qt_segmentation-plugin.
-
Global Reinit: Re-initializes the render windows to the common bounding box of all data nodes of the data storage that
-
have not set
"includeInBoundingBox"to false -
are
"visible".
-
have not set
-
Reinit: Re-initializes the render windows to the common bounding box of all selected data nodes of the data storage that
-
have not set
"includeInBoundingBox"to false -
are
"visible".
-
have not set
- Save: see Saving Data section
- Remove: Removes all selected data nodes from the data storage.
- Show only selected nodes: Enables the visibility of all selected data nodes and hides all other data nodes.
- Toggle visibility: Shows / hides each selected data node according to each node's current visibility state.
- Show details: Opens a pop-up window with detailed information about each node, like data type, geometry, DICOM information, file path etc.
- Opacity: Sets the opacity via a slider for the rendering of the selected data node.
- Color: Opens a pop-up window that allows to pick an arbitrary color for the rendering of all selected data nodes.
- Colormap: Opens another submenu with a list of different colormaps that can be chosen for the rendering of all selected data nodes.
- Component: Sets the currently visible data component for the rendering of this particular component of the selected data node.
- Texture Interpolation: Smooths the data visualization for rendering of a selected data node.
-
Surface Representation: Opens another submenu with the following entries:
- Points: Visually represents a surface (a data type) as a set of points.
- Wireframe: Visually represents a surface (a data type) as a wireframe model.
- Surface: Visually represents a surface (a data type) as a solid surface.
As the description of the actions showed, it is possible to open / use the context menu with a single data node or with a set of selected data nodes. If the data types of multiple selected data nodes differ, the actions might not appear / work as expected. Also some actions are not available for a set of selected data nodes.

Preferences
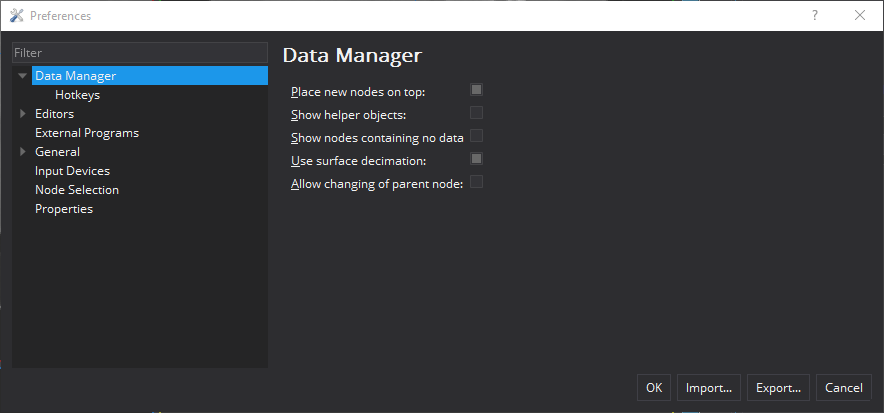
The MITK Workbench provides a preference page for specific plugins. The preference page provided for the Datamanager can be seen in the Preference page screenshot. The user can open the preference page by
- using the keyboard shortcut Ctrl + p
- using Window -> Preferences... from the top menu.
It allows to set the following preferences for the Datamanager, which define the behavior of the Datamanager:
- Place new nodes on top: If enabled, newly added data nodes will be inserted at the top of the list of data nodes inside the Datamanager. If disabled, newly added nodes will be inserted at the bottom of the list.
-
Show helper objects: If enabled, data nodes that have set
"helper object"to true will be displayed in the Datamanager. If disabled, data nodes that have set"helper object"to true will not be visible in the Datamanager. - Show nodes containing no data: If enabled, data nodes that have no underlying base data defined will be displayed in the Datamanager. If disabled, data nodes that have no underlying base data defined will not be visible in the Datamanager. If disabled, the surface will have its original number of triangles in the triangle mesh.
- Allow changing of parent node: If enabled, the user can change the hierarchy of the data nodes manually by dragging one or multiple data nodes and dropping them at any position inside the Datamanager (see Working with the Datamanager) for changing the order of the data nodes manually).

Hotkeys
The MITK Workbench provides hotkeys for specific plugins. The hotkeys provided for the Datamanager can be seen in the Hotkeys screenshot. They allow to expedite common operations in relation to data nodes or the Datamanager. The user can customize the hotkeys by accessing the preference page:
- using the keyboard shortcut Ctrl + p
- using Window -> Preferences... from the top menu
- Delete selected nodes Removes all selected data nodes from the data storage.
-
Global reinit Re-initializes the render windows to the common bounding box of all data nodes of the data storage that
-
have not set
"includeInBoundingBox"to false -
are
"visible"
-
have not set
- Make all nodes invisible Hides all data nodes of the data storage.
-
Reinit selected nodes Re-initializes the render windows to the common bounding box of all selected data nodes of the data storage that
-
have not set
"includeInBoundingBox"to false -
are
"visible"
-
have not set
- Show node information Opens a pop-up window with detailed information about each node, like data type, geometry, DICOM information, file path etc.
- Toggle visibility of selected nodes: Shows / hides each selected data node according to each node's current visibility state.

