Table of Contents
Introduction
This view offers the possibility to map any loaded image or point set using a user selected registration object. When mapping images the user can control the field of view (image geometry) the image should be mapped into, as well as the interpolation strategy and padding values that should be used.
It is one of several MatchPoint registration plugins.
Typical usage scenarios
You have registered image I1 onto image I2. Now you want to
- (Most obvious) map I1 onto I2 with the registration, e.g. to make a joint statistical analysis.
- map image I3 (e.g. an other MRI sequence of the same session) also onto I2 with the same registration.
- map a segmentation created on I1 also onto I2 with the same registration.
- map a point set of image I1 also onto I2 with the same registration.
Usage
To use the mapper at least the input (image or point set) must be selected. Additionally, you may select a registration object and, in case the input is an image, an optional reference image.
The reference image defines the geometry (field of view, orientation, spacing) that should be used for the result image. The view will try to automatically determine the reference image. By default it is the target image that was used to determine the selected registration. If auto selection cannot determine the reference (e.g. because it was not specified or it is currently not loaded), the input image will be selected as reference. The reference image can be also defined by the user explicitly by activating manual selection.
REMARK: If you map point sets you can ignore the reference image slot. It has no effect.
REMARK: The mapping results will be added as child nodes to the used input node.
REMARK: If you do not select an registration the view will assume that you make an identity transform. This is a convenient way if you just want to resample an image into the geometry of an other image (when no registration is needed). Also in this use case you can take advantage of the different interpolation and sub/super sampling strategies.

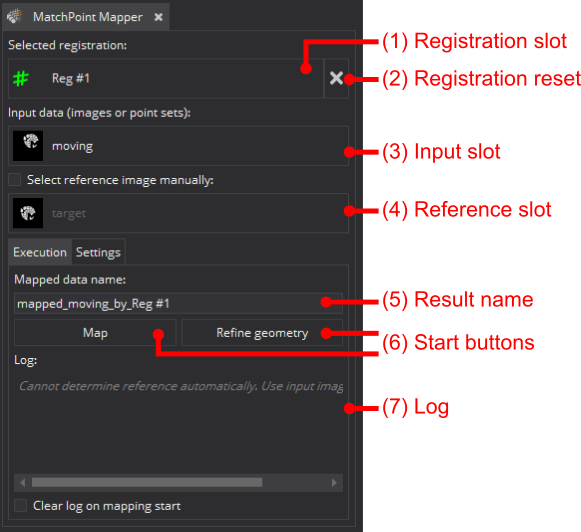
(1) The currently selected registration that will be used for mapping. Click to change.
(2) Reset button that will remove the current selected registration and switch back to an identity transform.
(3) The currently selected input data, that will be mapped. Click to change.
(4) The currently (automatically or by user) selected reference image, that defines the geometry of the result. Click to change.
(5) The name of the result data in the data manager.
(6) The start button(s) to commence the mapping process. For details regarding the two options see Mapping or geometry refinement .
(7) Log windows with messages regarding the mapping process.
Mapping or geometry refinement
The mapper view offers two options to map images:
- "Map" (default)
- "Refine geometry" For images "Map" fills the pixels of the output image by interpolating input image pixels using the registration object. This option always works, but may take longer and introduces interpolation errors, because a new image is resampled.
The second option "Refine geometry" is only offered, if the registration (more precisely its inverse kernel) is matrix based and the selected data is an image. In this case it just clones the image and refines its image geometry (origin and orientation) to project it to the position indicated by the registration; thus no interpolation artefacts are introduced.- Remarks
- If you want to use a mapped image in conjunction with the image statistics plugin and a mask of the reference image (or you want to proceed any other computation that expects the voxel to be in the same grid for direct numeric comparison), you must use "Map" to ensure the same geometry (including the same image grid; including same spacing and resolution). Otherwise operations like the images statistics plugin will fail.
Settings

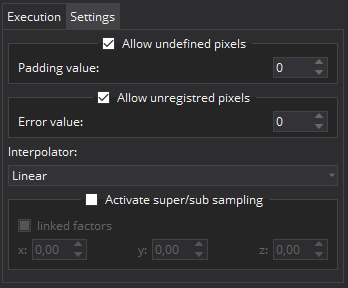
If you map the image (and not just refine the geometry), you have several settings available:
- "Allow undefined pixels": Activate to handle pixels of the result image that are not in the field of view of the input image. These pixels will get the "padding value".
- "Allow unregistered pixels": Activate to handle pixels of the result image that can not be mapped because the registration does not support this part of the output image. These pixels will get the "error value".
- "Interpolator": Set to choose the interpolation strategy that should be used for mapping.
- "Activate super/sub sampling": Activate if you want to use origin and orientation of the reference image but want to alter the spacing.
Interpolation
You can choose from the following interpolation strategies:
- "Nearest Neighbor": Use the value of the nearest pixel. Fastest, but high interpolation errors for gray value images. Right choice for label images or masks.
- "Linear": Fast linear interpolation with often sufficient quality. Tends to blur edges.
- "BSpline (3rd order)": Good trade off between time and quality.
- "Windowed Sinc (Hamming)": Good interpolation quality but very time consuming.
- "Windowed Sinc (Welch)": Good interpolation quality but very time consuming.
Handling of masks/segmentations
If you select an mask as input image, the plugin will be automatically reconfigured to settings that are suitable for the task of mapping masks. Most importantly the interpolator will be set to "Nearest Neighbor".
