Table of Contents
General remark on F1 help
This is the help window of the MxN display. To display the help windows of other plugins, press F1 when the plugin of interest is active (please make sure the tab of the plugin of interest is highlighted). Alternatively, go to the Help menu and select Open Help Perspective. A help window opens from which you can select the documentation of the plugin of interest.
Overview
The MxN display is an alternative image viewer to the Standard display. It is a more flexible, customizable approach to displaying images with a strong focus on displaying different images simultaneously but independently. Unlike than the Standard Display it allows to show a different image for each window view while also allowing independent image navigation. The number of window views can be freely chosen and anatomical view planes / view directions can be changed for each window view.
Working with the MxN display
The following sections describe how to work with the MxN display. The MxN display can be customized and several properties can be set to modify the behavior.
Configuration Toolbar
The MxNDisplay is initialized with a single window view and a configuration toolbar on the right side. In the toolbar you can find three icons / actions, where two buttons have an on/off state.

Layout button | |

Synchronize button | 
Desynchronize button |

MITK mode button | 
PACS mode button |
- Layout button: Choose a layout from presets or select a custom number of available window views and their layout in a grid
- Synchronization button: Enable or disable synchronized interaction across the window views
- Interaction mode button: Switch between the MITK interaction mouse mode and the PACS interation mouse mode
MxN display layout
There are several options to customize the MxN display layout.
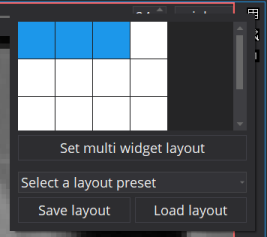
Using the layout button from the configuration toolbar allows to customize the layout the following way:
- By choosing the desired amount of windows and confirming via "Set multi widget layout". The window views are arranged in a rectangular grid, as specified. Depending on the selected number of window views, existing window views will be removed or additional window views will be added. New window views will have a sagittal view direction. Window views that stay untouched will keep their settings and continue displaying their selected data.
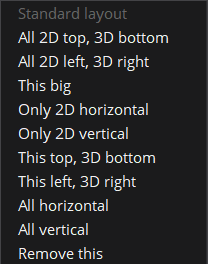
- By selecting one of the provided layout presets.
- By saving / loading a custom layout, either created using the previous methods and further refinement or by handcrafting a suitable file.
By moving the cursor to the upper right corner of any window you can activate the window menu. It consists of three buttons:
- The crosshair button allows to toggle the crosshair and to reset the view.
- The middle button expands the corresponding window to fullscreen.
- The right button allows you to choose between many different arrangements of the available windows.
Window synchronization
If data is displayed inside a window view you can interact with the window / loaded image using your mouse. As long as the interaction synchronization is disabled (), mouse interactions, such as zooming, setting the point of interest, mouse wheel scrolling etc. will affect only the window view you click in. If the interaction synchronization is enabled (), performing any of the mouse interactions inside a window view will perform the same interaction in any other visible window view.
Mouse interaction mode
As mentioned before, you can use the mouse to interact with each window / loaded image. There are two interaction modes which can be switched between using the interaction mode button: the MITK interaction mouse mode and the PACS interaction mouse mode. If the PACS interaction mouse mode is selected, an interaction tool bar is added to the left side of the MxN display: It allows to select the action to perform for the left mouse button. The difference between the MITK and PACS mode is as follows:
MITK interaction mouse mode
- left mouse button: setting the point of interest
- right mouse button: zooming in and out while moving the mouse
- middle mouse button / pressing mouse wheel: moving the image while moving the mouse
- mouse wheel: scrolling through the displayed image slices
PACS interaction mouse mode
- left mouse button: depending on the selected mode in the interaction tool bar
- right mouse button: changing the level window for the topmost visible image under the mouse cursor
- middle mouse button / clicking mouse wheel: no interaction
- mouse wheel: scrolling through the displayed image slices
- strg-key + right mouse button: zooming in and out while moving the mouse
- shif-key + right mouse button: moving the image while moving the mouse
Utility Menu
Each window view has a utility menu at the top with four UI elements that allow to perform the following actions:
- Data selection button: Select which data should be selected and visible inside the window view
- Lock / unlock button: Set the lock state of a window to couple / decouple the window from other windows.
- Slice slider: Navigate along the view direction of this window
- View direction drop down menu: Select the current anatomical view plane / view direction

Data node selection
Using the data selection button of a window view you can open a data node selection dialog which shows the currently selected data nodes for the window view. "Currently selected" means that you can either decide to show all available data nodes from the data storage or - for a better data node overview - only show an individually selected subset of the available data nodes. You can either remove a node from the selection by clicking the "x" on a data node or use the "Change selection" button to individually select data nodes. The "Select all nodes" checkbox denotes which of the selection types is currently used - showing all available data nodes or showing only a subset of data nodes. Checking the checkbox will reset the selection to all available data nodes.
Selecting data nodes does not mean that this node always has to be visible in the window view (rendered). If you want to hide a node, e.g. for temporarily inspecting underlying images, you can do so by clicking the "eye" icon for each selected data node.
If you want to reset the window view to a specific node / image, you can use the "arrow" icon. This will reset the camera to focus on the selected node, using default zoom and centered camera position. If you want so reset the camera to focus on the whole scene / all selected nodes, you can use the window menu, see MxN display layout. Resetting a window only affects the corresponding window view, regardless of any synchronization / lock state.
Lock button
So far showing / hiding nodes or removing them from a selection / changing a selection affected all window views. If you want to use individual selections for a window view, you can unlock / decouple the window view from other window views by clicking on the lock button in the utility menu. This will decouple the current window view. Changing the visibility of a node or selecting individual nodes / removing nodes using the data node selection button will affect only the current window view. This allows to show different images in each window view, e.g. by decoupling multiple window views and selecting individual nodes in each window. It is still possible to have a synchronized mouse interaction, see Window synchronization and Mouse interaction mode.
Slice selection slider
Displayed data is typically 3D data but each window view shows a 2D slice of the 3D volume. The direction in which the 3D volume is sliced is defined by the "view direction" (or "anatomical plane"). To define at which position in the view direction the 3D volume should be sliced, the slice selection slider can be used. It can either be moved using the mouse or by using the appropriate mouse interaction (see above, e.g. mouse wheel scroling).
View direction
Each window view "is looking in" one of the three avaiable view directions, namely "Axial", "Sagittal" or "Coronal". You can change the view direction by switching to another anatomical plane in the view direction drop down menu. Changing the view direction will reset the camera to its default for the new view direction, meaning default zoom and centered camera position.