|
Medical Imaging Interaction Toolkit
2016.11.0
Medical Imaging Interaction Toolkit
|
|
Medical Imaging Interaction Toolkit
2016.11.0
Medical Imaging Interaction Toolkit
|

Available sections:
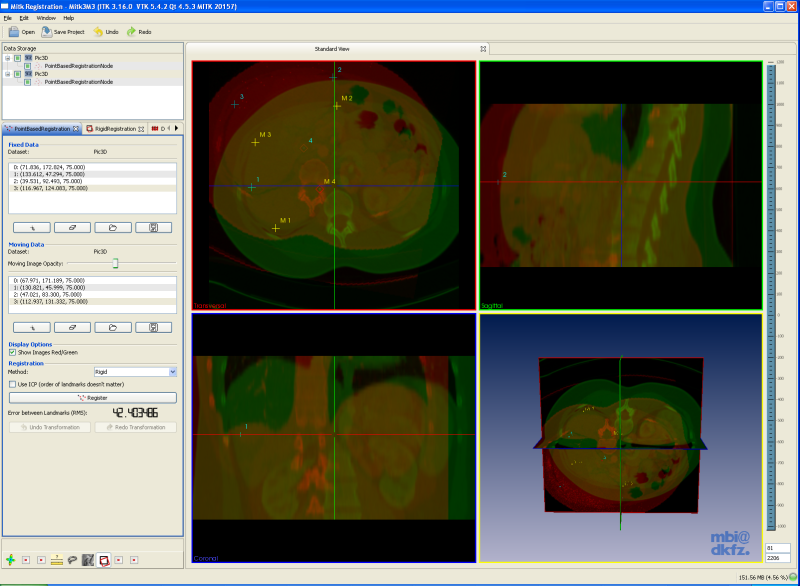
This view allows you to register two datasets in a rigid and deformable manner via corresponding PointSets. Register means to align two datasets, so that they become as similar as possible. Therefore you have to set corresponding points in both datasets, which will be matched. The movement, which has to be performed on the points to align them, will be performed on the moving data as well. The result is shown in the multi-widget.
This document will tell you how to use this view, but it is assumed that you already know how to navigate through the slices of a dataset using the multi-widget.
First of all you have to open the data sets which you want to register and select them in the Data Manager. You have to select exactly 2 images for registration. The image which was selected first will become the fixed image, the other one the moving image. The two selected images will remain for registration until exactly two images were selected in the Data Manager again. While there aren't two images for registration a message is viewed on top of the view saying that registration needs two images. If two images are selected the message disappears and the interaction areas for the fixed and moving data appears. The upper area is for interaction with the fixed data. Beneath this area is the interaction area for the moving data. On default only the fixed and moving image with their corresponding pointsets are shown in the render windows. If you want to have other images visible you have to set the visibility via the Data Manager. Also if you want to perform a reinit on a specific node or a global reinit for all nodes you have to use the Data Manager.

The "Fixed Data" area contains a QmitkPointListWidget. Within this widget, all points for the fixed data are listed. The label above this list shows the number of points that are already set. To set points you have to toggle the "Set Points" button, the leftmost under the QmitkPointListWidget. The views in the QmitkStdMultiWidget were reinitialized to the fixed data. Points can be defined by performing a left click while holding the "Shift"-key pressed in the QmitkStdMultiWidget. You can remove the interactor which listens for left clicks while holding the "Shift"-key pressed by detoggle the "Set Points" button. The next button, "Clear Point Set", is for deleting all specified points from this dataset. The user is prompted to confirm the decision. With the most right button, a previously saved point set can be loaded and all of its points are shown in the QmitkPointListWidget and in the QmitkStdMultiWidget. The user is prompted to select the file to be loaded. The file extension is ".mps". On the left of this button is the save button. With this function all points specified for this dataset and shown in the QmitkPointListWidget are saved to harddisk. The user is prompted to select a filename. Pointsets were saved in XML fileformat but have to have a ".mps" file extension. You can select landmarks in the render window with a left mouse button click on them. If you keep the mouse button pressed you can move the landmark to an other position by moving the mouse and then release the mouse button. With the delete key you can remove the selected landmarks. You can also select landmarks by a double click on a landmark within the QmitkPointListWidget. Using the "Up-Arrow"-button or the "F2" key you can easily move a landmark upwards and bring it further downwards by pressing "F3" or using the "Down-Arrow"-button. Thus the landmark number can be changed. The QmitkStdMultiWidget changes its view to show the position of the landmark.
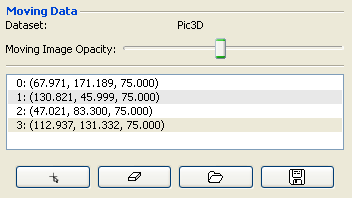
The "Moving Data" area contains a QmitkPointListWidget. Within this widget, all points for the moving data are listed. The label above this list shows the number of points that are already set. To set points you have to toggle the "Set Points" button, the leftmost under the QmitkPointListWidget. The views in the QmitkStdMultiWidget were reinitialized to the moving data. With the "Opacity:" slider you can change the opacity of the moving dataset. If the slider is leftmost the moving dataset is totally transparent, whereas if it is rightmost the moving dataset is totally opaque. Points can be defined by performing a left click while holding the "Shift"-key pressed in the QmitkStdMultiWidget. You can remove the interactor which listens for left mousebutton click while holding the "Shift"-key pressed by detoggle the "Set Points" button. The next button, "Clear Point Set", is for deleting all specified points from this dataset. The user is prompted to confirm the decision. With the button on your right hand side, a previously saved point set can be loaded and all of its points are shown in the QmitkPointListWidget and in the QmitkStdMultiWidget. The user is prompted to select the file to be loaded. The file extension is ".mps". On the left of this button is the save button. With this function all points specified for this dataset and shown in the QmitkPointListWidget are saved to harddisk. The user is prompted to select a filename. Pointsets were saved in XML fileformat but have to have a ".mps" file extension. You can select landmarks in the render window with a left click on them. If you keep the mouse button pressed you can move the landmark to an other position by moving the mouse and then release the mouse button. With the delete key you can remove the selected landmarks. You can also select landmarks by a double click on a landmark within the QmitkPointListWidget. Using the "Up-Arrow"-button or the "F2" key you can easily move a landmark upwards and bring it further downwards by pressing "F3" or using the "Down-Arrow"-button. Thus the landmark number can be changed.The QmitkStdMultiWidget changes its view to show the position of the landmark.

In this area you can find the "Show Images Red/Green" checkbox. Here you can switch the color from both datasets. If you check the box, the fixed dataset will be displayed in redvalues and the moving dataset in greenvalues to improve visibility of differences in the datasets. If you uncheck the "Show Images Red/Green" checkbox, both datasets will be displayed in greyvalues.
Before you perform your transformation it is useful to see both images again. Therefore detoggle the "Set Points" button for the fixed data as well as for the moving data.
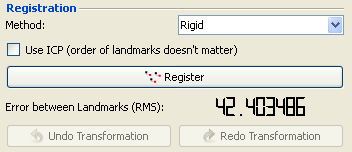
The functions concerning the registration are displayed in the "Registration" area. It not only contains the registration method selection and the registration itself but also offers the possibility to save, undo or redo the results. Furthermore a display is implemented, which shows you how good the landmarks correspond. Those features will be explained in following paragraphs.
Using the "Method"-selector, you can pick one of those transformations: Rigid, Similarity, Affine and LandmarkWarping. Depending on which one you chose, an additional specifier, "Use ICP" can be set, which leads to the following possibilities for registration:
The root mean squares difference between the landmarks will be displayed as number, so that you can check how good the landmarks correspond.
The "Undo Transformation" button becomes enabled after performing a transformation and allows you to undo it. After doing this, the "Redo Transformation" button is enabled and lets you redo, the just undone transformation(no calculation needed)
Saving of the transformed image can be done via the Data Manager.
 1.8.9.1
