|
Medical Imaging Interaction Toolkit
2016.11.0
Medical Imaging Interaction Toolkit
|
|
Medical Imaging Interaction Toolkit
2016.11.0
Medical Imaging Interaction Toolkit
|
Available sections:
The IGT-TrackingLab is the last step of the IGT tutorial. In the following you can learn how to use the plugin by reading this manual. IGT-TrackingLab shows example usage for many IGT classes and is also an example navigation implemented with IGT.
The symbol of the Tracking Lab View is the following:
The view looks like this:
With this tutorial you will register a book using a tracking device of your choice and the MITK's book surface file. The registration will enable you to move the book in the real world and observe its movement in the MITK display. It also allows you to record PointSets or use the CameraView which simulates a Camera at the tip of your pointer.
First connect your tracking device to your PC. Then start the MITK Workbench and configure your tracking device using the Tracking Toolbox View.
Select the desired Navigation Data Source. Now it's time to define which tool shall be used as object marker and which tool shall be used as pointer. Next load the Book surface provided with the example data (e.g. book.stl from the MITK-Data repository which comes with every superbuild or may also be checked out separately) into MITK. Fixate the object marker on a real book of your choice. Now we need to tell MITK that the object marker has been fixated on a physical object. To do this, select the Book as surface in the Object Selection submenu as you can see in the screenshot above.
Now we need to register the object marker to the surface it's fixed upon, in our case the book. To do this, first press the initial registration button. For MITK to be able to do this registration, we need to
Press Register to finalize the initial registration. Now the object marker is registered onto the book. You can see this in the MITK image. If needed the FRE is shown in the widget.
Now everything is set up and registered. We can thus activate permanent registration to continuously track the object, the object marker and the pointer.
For this, simply press the Permanent Registration button and select Activate permanent registration. You can now move the book in the real world and see the same movement in the MITK Display. A nice test to see if everything was correctly registered is to target the corners of the book with the pointer and check if the correct corners are pointed to in the MITK Display.
A user might now want to track a tool's trajectory. For this, the PointSet Recording was created.
First click on PointSet Recording. Now select your tracking source and the tool whose trajectory shall be recorded. Activate the Point Set Recording checkbox. In the MITK Display little green points will now be drawn for every measured position. Deactivate the checkbox to stop recording. The trajectory is saved in the PointSet Recorded Points visible in the Data Manager.
Another possible tracking application is the Camera View. Here, a virtual camera is placed at the pointers tip and its images are shown in the MITK Display.
Select Camera View and as usual the Tracking Source and the tool you want to place the virtual camera on. Activate the "Activate Needle View" checkbox and move the pointer around the book. You can now see the book from the pointers perspective.
You may need to adjust the Needle View Direction and the View Up Vector. This is always relative to your tools coordinate center origin. An example of the NDI pointer tool coordinate system is shown below:
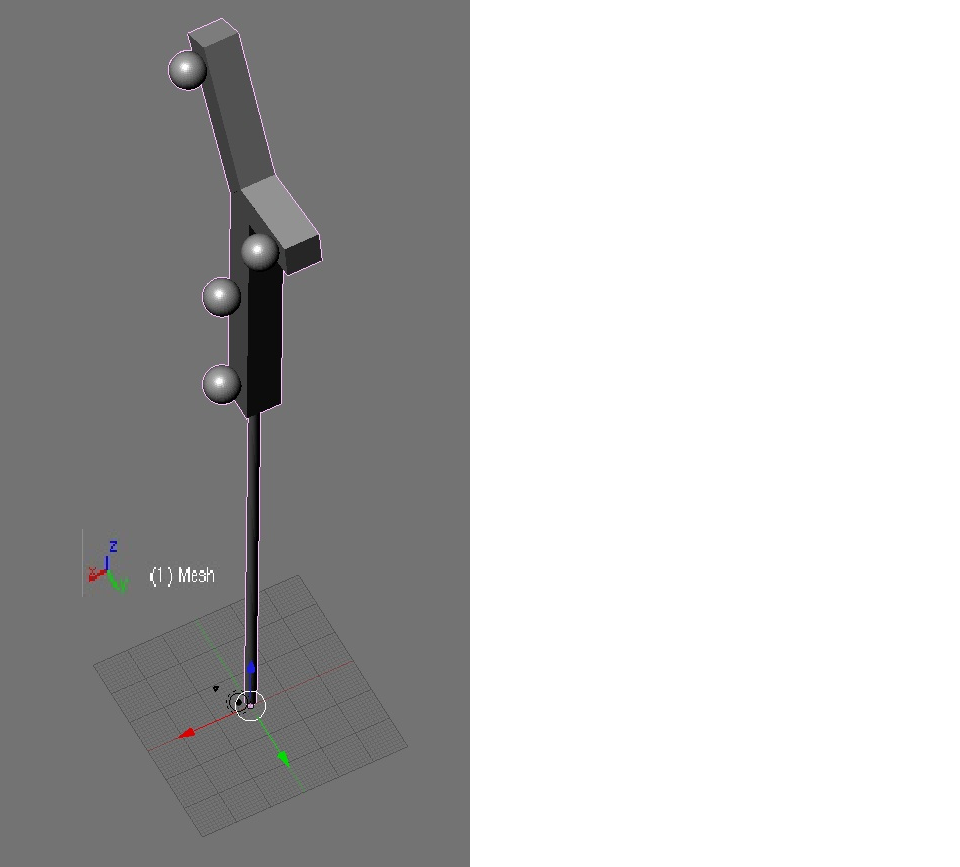
In the above case, the camera should look in inverse z-direction, and the view up vector should probably be set to positive x. Note this is just an example and may be different depending on your pointer.
Return to the [IGT Tutorial Overview]
 1.8.9.1
