|
Medical Imaging Interaction Toolkit
2016.11.0
Medical Imaging Interaction Toolkit
|
|
Medical Imaging Interaction Toolkit
2016.11.0
Medical Imaging Interaction Toolkit
|
MITK provides finished DataInteractors for a variety of tasks, they can be found in Core/Code/Interactions. They can be used with state machine patterns and config files located under Core/Code/Resources/Interactions.
A mitk::DataInteractor consists of four parts. The class describing the functionality and two XML files; one describes the state machine pattern, that is the workflow of an interaction and the second describes the user events which trigger an action. Lastly every mitk::DataInteractor works on a mitk::DataNode in which it stores and manipulates data. To use a mitk::DataInteractor these parts have to be brought together.
TODO add code of mitk::PointSetDataInteractor Plugin ..
This code demonstrates the use of an existing mitk::DataInteractor exemplary for the mitk::PointSetDataInteractor:
First we need a mitk::DataNode in which the PointSets is stored. It has to be added to the mitk::DataStorage.
Then we create an instance of a mitk::PointSetDataInteractor and load a predefined statemachine pattern as well as a configuration for it:
Lastly the mitk::DataNode is added to the mitk::DataInteractor
now the mitk::DataInteractor is ready for usage.
The behavior of a mitk::DataInteractor is determined by two aspects. One, the state machine pattern which describes the flow/order of actions that are performed. Secondly the configuration which determines which user interaction triggers the actions.
Sometimes it may be desirable to change the behaviour of the mitk::DisplayInteractor which controls zooming, panning and scrolling, e.g. when a Tool is activated that reacts to the same events. Changing the behavior of the DisplayInteractor (or possibly any other EventHandler) can be achieved from anywhere in the code by requesting the InteractionEventObserver and assigning an alternative configuration to it, as demonstrated in this example:
This second part of the tutorial step goes beyond the activation of an interactor, that modifies data by user interaction) as shown above. It shows what needs to be implemented to add a new way of interaction within your MITK application. Please see Interaction Concepts as an introduction to the MITK interaction mechanism, you may also want to read Interaction Concept Implementation.
This tutorial is structured as follows: The first section deals with config files, describing all the parameters of events and how to use them in a configuration file. In the second section the basics are described that are needed to write a state machine pattern. The last section deals with brining configuration, state machine pattern and code together and gives an exemplary implementation of a mitk::DataInteractor.
Events are described by their parameters. Each event type has its own set of parameters that can be set in the configuration file. If a parameter is omitted it is set to its default value. All possible parameters are listed and described below. Event parameters are also described in the documentation of the event class itself.
Mandatory for each event description is the event class and the event variant. The parameters of an event are set by attribute tags.
Mouse Buttons
mitk::InteractionEvent::MouseButtons represent the buttons. They can be used for two attributes. First the EventButton attribute which describes the button that triggered the event, this always is a single button. Secondly the ButtonState attribute that describes which buttons were pressed at the moment the event has been generated. For example assume the right mouse button and the middle mouse button are already pressed, now the left mouse button is pressed too and generates a second event, this would be described as follows:
Note: Technically the LeftMouseButton is also pressed and should be listed in the ButtonState, but this is taken care of by the mitk::EventFactory .
Key Events
mitk::InteractionKeyEvent represents a pressed key, which key is pressed is provided with the Key attribute like this
or
The names for special keys are listed here:
Modifier Keys
mitk::InteractionEvent::ModifierKeys represent the combination of pressed modifier keys, several modifier keys pressed at the same time are denoted by listing them all separated by commas.
ScrollDirection
This attribute is unique to the mitk::MouseWheelEvent and describes the direction in which the mouse wheel is rotated. In the event description actual only the direction is provided, but the event is generated with the actual value, and this value can be retrieved from the object.
Examples for key events:
Examples for MousePress events:
There exists a standard configuration file for the most common events called GlobalConfig.xml that can be used to as a default and can be extended by a specific definition.
It is also possible to store parameters in the config file. Those are stored using the param-tag, like this:
Within the application these properties can then be access via a mitk::PropertyList like this:
A state machine pattern is described in a XML file.
States are described using the state-tag. Each state has to have a name. Exactly one state has to be a start state in each state machine to indicate the state in which the state machine is set when it is constructed. So a valid, but rather useless state machine would like like this:
Optionally a state can be assigned a special mode that influences the event distribution. These modes are GRAB_INPUT , PREFER_INPUT and REGULAR (where REGULAR is default and does not need to be indicated). See Event Distribution for a description of these modes. Use the special modes only when necessary as they prevent other DataInteractors to receive events.
Transitions are part of a state and describe all possible state switches, and are therefore important for modeling an interaction scheme. Transitions consist a part that describes the event which triggers the transition (event class and event variant) and a target which is state to which the state machine switches after executing a transition. An event class describes the event type (see mitk::InteractionEvent for the different classes) and the event variant is a specification thereof and the exact description is taken from a config file. Together they determine which event can trigger this transition. For example this state machine will switch from state A to state B when the StdMousePressPrimaryButton event (left mouse button is pressed) occurs.
The event class description supports the polymorphism of the event classes. Therefore state machine patters should be written in the most general ways possible. So for a given class hierarchy like this:
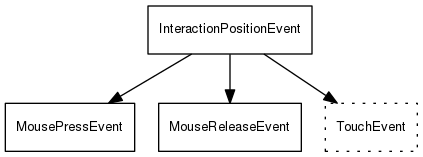
in the state machine pattern the mitk::InteractionPositionEvent can be declared as event class to restrict to the events which hold a position information. The actual implementation is then given in the configuration file. In this case it allows to define events of the classes mitk::InteractionPositionEvent itself, or mitk::MousePressEvent, mitk::MouseReleaseEvent, mitk::TouchEvent. This has the advantage that the patterns remain the same no matter what input devices are used, and the state machine patterns can be configured for newly added event classes as long as they match the class hierarchy (this ensures they hold the necessary properties).
Actions can be added to transitions and represent functions in the mitk::DataInteractor that are executed on taking a transition. The following simple state machine will listen for left mouse clicks and execute two actions (and actually never stop).
In order to tell the mitk::DataInteractor which function to execute these actions are made known to the mitk::DataInteractor using the CONNECT_FUNCTION macro. This example assumes that there exists an ExampleInteractor which inherits from mitkDataInteractor. This class implements the functions AddPoint and CountClicks. The actions are introduced by implementing the virtual method ConnectActionsAndFunctions():
Conditions can be added to transitions and represent functions in the mitk::DataInteractor that are executed on taking a transition. A condition is used to determine if a following action should be executed or not.
In order to tell the mitk::DataInteractor which function to execute these conditions are made known to the mitk::DataInteractor using the CONNECT_CONDITION macro. The ConnectActionsAndFunctions() method has to be augmented accordingly:
The usage of custom files slightly differs from the existing ones. Custom pattern and config files have to be stored in the /Resources/Interactions directory of the Module that they were designed for. When loading files from a module location into an interactor, the module has to be supplied as a parameter:
See Register statemachine patterns and configuration w/o the build system for a description.
DataInteractors are to inherit from mitk::DataInteractor. Their functionality is implemented in functions that follow this interface: For Actions:
For Conditions:
Your functions are connected with actions and conditions by implementing the function ConnectActionsAndFunctions(), e.g.
Now all that is left is to write a state machine pattern and a config file as is described in the tutorials.
To provide a useful example the mitk::PointSetDataInteractor is annotated with comments that describe the important parts for an implementation of a mitk::DataInteractor.
This step assumes knowledge of the Interaction concept described in Interaction Concepts and some background of the implementation which is described in DataInteractionPageTechnical. Please refer to these pages before proceeding.
Now all that is left it to write a state machine pattern and a config file as is described in the tutorials.
A useful tool in creating DataInteractors is mitk::InternalEvent which allows the mitk::DataInteractor to send signals on its own. The following will describe how to build a mitk::DataInteractor that allows to add points until a certain number of points is reached. The number of accepted points is provided in the config file as a parameter. So we start by writing a state machine pattern that add points until it receives an mitk::InternalEvent telling it, that enough points have been added.
In our config file we set the number of maximal points to 10, and define AddPointClick as a right mouse click with the ctrl button pressed.
The implementation is described in the following.
Implementation of protected functions:
ConnectActionsAndFunctions - Is inherited from mitk::InteractionStateMachine, here action strings from the xml are connected with functions in the mitk::DataInteractor (as seen above). In our example this looks like this:
ConfigurationChanged - Is called whenever a new configuration file is loaded (by the mitk::InteractionEventHandler super class), this function allows to implement initialization code that depends on configuration values. In our example we want to set the limit of allowed points:
Next the actual functionality of the DataInteractor is implemented, by providing one function per action, following this prototype described before.
If the conditions returns false the calling transition and the included actions will not be executed. If a condition fails the event is considered as untreated, and will be offered to other Interactors.
Here we see an internal event used to signal that the point set reached the maximal number of allowed points. The event is created and added to the Dispatchers event queue.
There are also two documented classes implementing a mitk::DataInteractor and a mitk::InteractionEventObserver which can be looked at for further understanding:
Have fun with creating your own interaction and please think about contributing it to MITK!
If you meet any difficulties during this step, don't hesitate to ask on the MITK mailing list mitk-users@lists.sourceforge.net! People there are kind and will try to help you.
 1.8.9.1
