|
Medical Imaging Interaction Toolkit
2016.11.0
Medical Imaging Interaction Toolkit
|
|
Medical Imaging Interaction Toolkit
2016.11.0
Medical Imaging Interaction Toolkit
|

Welcome to the basic MITK user manual. This document tries to give a concise overview of the basic functions of MITK and be an comprehensible guide on using them.
MITK is an open-source framework that was originally developed as a common framework for Ph.D. students in the Division of Medical and Biological Informatics (MBI) at the German Cancer Research Center. MITK aims at supporting the development of leading-edge medical imaging software with a high degree of interaction.
MITK re-uses virtually anything from VTK and ITK. Thus, it is not at all a competitor to VTK or ITK, but an extension, which tries to ease the combination of both and to add features not supported by VTK or ITK.
Research institutes, medical professionals and companies alike can use MITK as a basic framework for their research and even commercial (thorough code research needed) software due to the BSD-like software license.
Research institutes will profit from the high level of integration of ITK and VTK enhanced with data management, advanced visualization and interaction functionality in a single framework that is supported by a wide variety of researchers and developers. You will not have to reinvent the wheel over and over and can concentrate on your work.
Medical Professionals will profit from MITK and the MITK applications by using its basic functionalities for research projects. But nonetheless they will be better off, unless they are programmers themselves, to cooperate with a research institute developing with MITK to get the functionalitiy they need. MITK and the MITK applications are not certified medical products and may be used in a research setting only. They must not be used in patient care.
The layout of the MITK applications is designed to give a clear distinction between the different work areas. The following figure gives an overview of the main sections of the user interface.
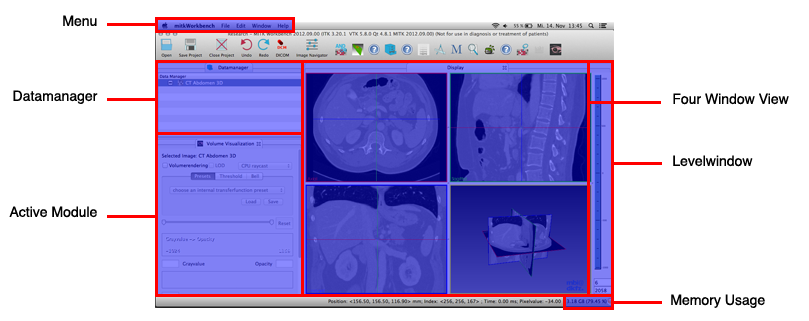
The datamanager and the Perspectives have their own help sections. This document explains the use of:
The four window view is the heart of the MITK image viewing. The standard layout is three 2D windows and one 3D window, with the axial window in the top left quarter, the sagittal window in the top right quarter, the coronal window in the lower left quarter and the 3D window in the lower right quarter. The different planes form a crosshair that can be seen in the 3D window.
Once you select a point within the picture, informations about it are displayed at the bottom of the screen.
Left click in any of the 2D windows centers the crosshair on that point. Pressing the right mouse button and moving the mouse zooms in and out. By scrolling with the mouse wheel you can navigate through the slices of the active window and pressing the mouse wheel while moving the mouse pans the image section.
In the 3D window you can rotate the object by pressing the left mouse button and moving the mouse, zoom either with the right mouse button as in 2D or with the mouse wheel, and pan the object by moving the mouse while the mouse wheel is pressed. Placing the cursor within the 3D window and holding the "F" key allows free flight into the 3D view.
By moving the cursor to the upper right corner of any window you can activate the window menu. It consists of three buttons.
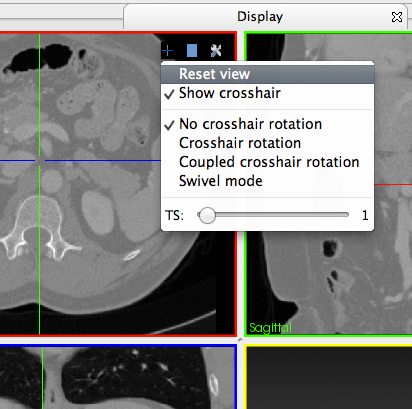
The crosshair button allows you toggle the crosshair, reset the view and change the behaviour of the planes.
Activating either of the rotation modes allows you to rotate the planes visible in a 2D window by moving the mouse cursor close to them and click and dragging once it changes to indicate that rotation can be done.
The swivel mode is recommended only for advanced users as the planes can be moved freely by clicking and dragging anywhere within a 2D window.
The middle button expands the corresponding window to fullscreen within the four window view.

The right button allows you to choose between many different layouts of the four window view to use the one most suited to your task.
This dialog allows you to save, load and clear entire projects, this includes any nodes in the data manager.
This dialog supports undo and redo operations as well as the image navigator, which gives you sliders to navigate through the data quickly.
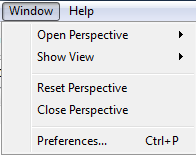
This dialog allows you to open a new window, change between perspectives and reset your current one to default settings.
If you want to use an operation of a certain perspective within another perspective the "Show View" menu allows to select a specific function that is opened and can be moved within the working areas according to your wishes. Be aware that not every function works with every perspective in a meaningful way.
The Preferences dialog allows you to adjust and save your custom settings.
This dialog contains this help, the welcome screen and information about MITK.
Once an image is loaded the levelwindow appears to the right hand side of the four window view. With this tool you can adjust the range of grey values displayed and the gradient between them. Moving the lower boundary up results in any pixels having a value lower than that boundary to be displayed as black. Lowering the upper boundary causes all pixels having a value higher than it to be displayed as white.
The pixels with a value between the lower and upper boundary are displayed in different shades of grey. This way a smaller levelwindow results in higher contrasts while cutting of the information outside its range whereas a larger levelwindow displays more information at the cost of contrast and detail.
You can pick the levelwindow with the mouse to move it up and down, while moving the mouse cursor to the left or right to change its size. Picking one of the boundaries with a left click allows you to change the size symmetrically. Holding CTRL and clicking a boundary adjusts only that value.
With line edit fields below you can directly adjust the levelwindow. The upper field describes the center of the levelwindow, the bottom the span of the window around the center. By selecting one of fields and typing any number you can set these two parameters.
The System Load Indicator in the lower right hand corner of the screen gives information about the memory currently required by the MITK application. Keep in mind that image processing is a highly memory intensive task and monitor the indicator to avoid your system freezing while constantly swapping to the hard drive.
Each solution for a specific problem that is self contained is realized as a single view. Thus you can create a workflow for your problem by combining the capabilities of different views to suit your needs. One elegant way to do this is by combining views in Perspectives.
By pressing and holding the left mouse button on a views tab you can move it around to suit your needs, even out of the application window.
The different tasks that arise in medical imaging need very different approaches. To acknowledge this circumstance MITK supplies a framework that can be build uppon by very different solutions to those tasks. These solutions are called perspectives, each of them works independently of others although they might be used in sequence to achieve the solution of more difficult problems.
It is possible to switch between the perspectives using the "Window"->"Open Perspective" dialog.
See Menu for more information about switching perspectives.
 1.8.9.1
