Table of Contents
Overview
The REST API View provides monitoring and control for the MITK REST API server. This server enables external applications such as Python scripts, web applications, or other tools to interact with MITK Workbench programmatically via standard HTTP requests.
With the REST API, external processes can:
- Query and modify data nodes in the Data Storage
- Read and write node properties
- Create and delete nodes
- Access node hierarchies and relationships
The REST API View allows you to:
- Start and stop the REST server
- Monitor server status and connection information
- Copy the server URL for use in external applications
- Track which clients have connected
- See the last request processed
- View which nodes have been accessed or modified via the API
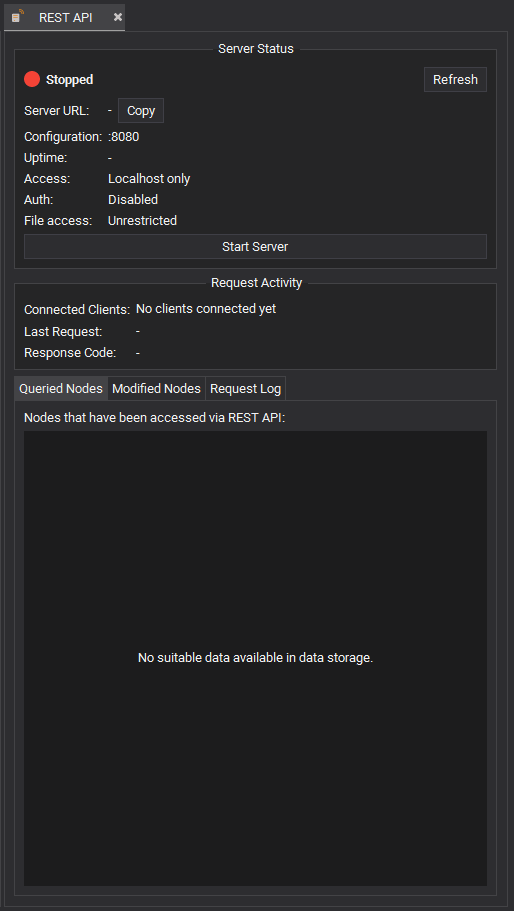
Server Status
The Server Status section displays the current state of the REST API server:
Status Indicator
A colored indicator shows the server state at a glance:
- Green: Server is running and accepting connections
- Red: Server is stopped
- Gray: REST API service is not available
Server URL
When the server is running, the full URL is displayed (e.g., http://localhost:8080). Click the Copy button to copy this URL to the clipboard for use in external applications.
Configuration
Shows the current host and port configuration (e.g., :::8080 for the default dual-stack bind). This can be changed in the preferences.
Start/Stop Server
Click the Start Server / Stop Server button to control the server lifecycle. The button text changes based on the current server state.
Request Activity
The Request Activity section provides information about client connections and requests:
Connected Clients
Displays a list of IP addresses that have sent requests to the server since it was started. This helps you identify which machines or processes are connected.
Last Request
Shows the most recent request processed by the server, including:
- HTTP Method: GET, POST, PUT, PATCH, or DELETE
- Endpoint: The API path that was accessed (e.g.,
/api/v1/datastorage/nodes)
Response Code
Shows the HTTP response code of the last request:
- 200: Success
- 201: Created (for POST requests)
- 400: Bad request
- 404: Not found
- 500: Internal server error
Node Tracking Tabs
The view includes two tabs that show which nodes have been accessed via the REST API:
Queried Nodes
Lists all data nodes that have been accessed (read) through the REST API. When a node is queried via the API, it receives a restapi.uid property that uniquely identifies it for API operations.
Modified Nodes
Lists all data nodes that have been modified through the REST API. This includes nodes where properties have been changed, or nodes that have been created via the API. Modified nodes receive a restapi.modified property.
These lists help you track which parts of your data have been touched by external processes.
Preferences
The REST API preferences can be accessed via Window > Preferences > REST API or by pressing Ctrl+P and navigating to REST API.
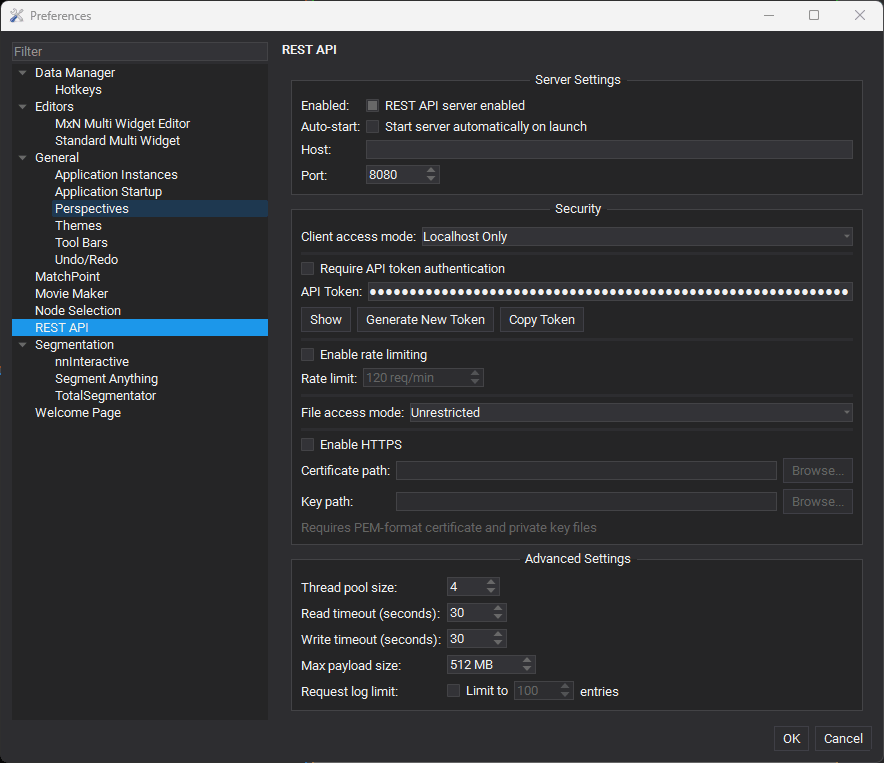
General Settings
- Enable REST API: Master switch to enable or disable the REST API functionality
- Auto-start server: When enabled, the server starts automatically during Workbench startup, as soon as the Data Storage becomes available (shortly after launch, not at the very first moment of process start). The
/healthand/datastorage/*endpoints respond as soon as the server is up, as do the/rendering/*endpoints that drive the rendering manager directly (update,reinit,selected-time) – though these still return503until the data they need exists (reinitneeds a loaded Data Storage,selected-timea time navigation controller). The render-window endpoints (/rendering/selected-position,/rendering/screenshotand/rendering/editors/*) additionally require the REST API workbench plugin (org.mitk.gui.qt.restapi) to be active and return503until it is – open the REST API view once to activate it.
Network Settings
- Host: The network interface to bind to (default:
::, the IPv6 wildcard, which also accepts IPv4 connections via 4-mapped addresses on Linux/macOS/Windows)- The default
::avoids the ~2 s IPv6-first / IPv4-fallback latency that Windows clients otherwise pay when resolvinglocalhost - Use
127.0.0.1to pin the server to IPv4 loopback only - Use
0.0.0.0to allow connections from any IPv4 network interface (use with caution)
- The default
- Port: The port number to listen on (default:
8080)
Performance Settings
- Thread Pool Size: Number of threads for handling concurrent requests (default: 4)
- Read Timeout: Maximum time in seconds to wait for incoming request data (default: 30)
- Write Timeout: Maximum time in seconds to wait for sending response data (default: 30)
Using the REST API
Quick Start
- Open the REST API View from Window > Show View > REST API
- Click Start Server
- Copy the server URL using the Copy button
- Use the URL in your external application (Python script, web browser, etc.)
API Endpoints
The REST API provides the following main endpoints (base URL: http://host:port/api/v1):
| Method | Endpoint | Description |
|---|---|---|
| GET | /health | Health check |
| GET | /info | API information |
| GET | /datastorage/nodes | List all nodes |
| POST | /datastorage/nodes | Create a new node |
| GET | /datastorage/nodes/{uid} | Get node details |
| DELETE | /datastorage/nodes/{uid} | Delete a node |
| GET | /datastorage/nodes/{uid}/properties | Get node properties |
| PUT | /datastorage/nodes/{uid}/properties/{key} | Set a property |
Python Example
Here is a simple Python example to list all nodes:
Testing with curl
You can test the API using curl from the command line:
Security Considerations
Important: The REST API is intended for local development and trusted network environments.
- By default, the server binds to
::(the IPv6 wildcard, dual-stack). The default client-access mode (LocalhostOnly) still rejects requests whose remote address is not127.0.0.1,::1, or::ffff:127.0.0.1, so even though the socket itself can accept off-host connections, only loopback clients are served. - If you change the host to
0.0.0.0, the server becomes accessible from other machines on your network. Only do this in trusted environments. - There is currently no authentication. Any process that can reach the server can read and modify your data.
- For production or untrusted environments, consider using a firewall or VPN.
Upgrade note: default host changed to <tt>::</tt>
Prior versions bound to 127.0.0.1 by default. From this version onwards the default host is :: (IPv6 dual-stack) to eliminate the ~2 s Windows localhost resolution latency that the IPv4-only default incurred. Filtering of remote clients is now done by the client-access mode, not by the bind address. If you change ClientAccessMode away from LocalhostOnly (for example to AllowAll), the server immediately becomes reachable from the network on the default host – you no longer need to also flip the host to 0.0.0.0. Review both the host and the access mode together before deploying.
Troubleshooting
"REST API service not available"
This message appears when the REST API module is not loaded. Ensure:
- The MitkRESTAPI module is included in your MITK build
- The autoload module is properly configured
Server fails to start
If the server fails to start, the status will show an error message. Common causes:
- Port already in use: Another application is using the configured port. Change the port in preferences.
- Permission denied: On some systems, ports below 1024 require administrator privileges.
Cannot connect from external application
- Verify the server is running (green status indicator)
- Check that you're using the correct URL (use the Copy button)
- If connecting from another machine, ensure the host is set to
0.0.0.0and no firewall is blocking the connection
IPv4-only clients see "connection refused" on Linux
On Linux hosts with net.ipv6.bindv6only=1 (a system-wide sysctl set by some distributions and security baselines), a socket bound to :: accepts IPv6 connections only – it will not accept IPv4 traffic, even on the loopback. Clients that connect to 127.0.0.1 or use an IPv4-only resolver will see "connection refused".
If you cannot disable the kernel flag, change the configured host to 0.0.0.0 (IPv4 wildcard) or to a specific IPv4 address. The MITK server sets the per-socket IPV6_V6ONLY=false hint, but it cannot override the system-wide kernel default.