Table of Contents
Contribution
This plugin was developed at the Centre For Medical Image Computing (CMIC), part of University College London (UCL) and contributed back to the MITK community with thanks.
Introduction
This view provides the facility to run third party command line programs, and load the data back into the DataManager for immediate visualisation. All that is required is that the command line application can be called with an argument of –xml and respond with a valid XML description of the necessary parameters, and currently, that if the program requires images, they must be NifTI images. This view can then generate a Graphical User Interface (GUI) dynamically from the XML to enable the user to interact with the command line application. This provides an easy to use, and potentially very flexible way to integrate almost any third party, medical imaging, command line application.
As a high level introduction, this view performs the following steps:
- The view searches for available programs to run, and for each valid module, stores the XML document describing the interface, and populates a searchable list of available programs.
- When a program is selected, the GUI is generated.
- The user can then set the necessary parameters and run the program.
- Multiple programs can be launched in succession and run simultaneously, and where available on the host platform, the user can pause, resume or cancel running jobs and see console output for each job.
As a consequence of the very flexible nature of this plugin, these instructions can only describe how to launch command line modules in a general sense. The examples shown have been constructed by the latest version of the NiftyReg package. Futher information on the NiftyReg package, including links to the source code, can be found on the wiki page here. NiftyReg provides valid XML descriptors to enable the integration of the NiftyReg affine (RegAladin) and and non-rigid (RegF3D) image registration algorithms, as well as utility programs to resample an image, and calculate a Jacobian image. These same XML descriptors work within Slicer and MITK based applications.
Preferences
The first time that the Command Line Modules View is launched, it is advisable to set the user preferences for the view. Please refer to Figure 1.
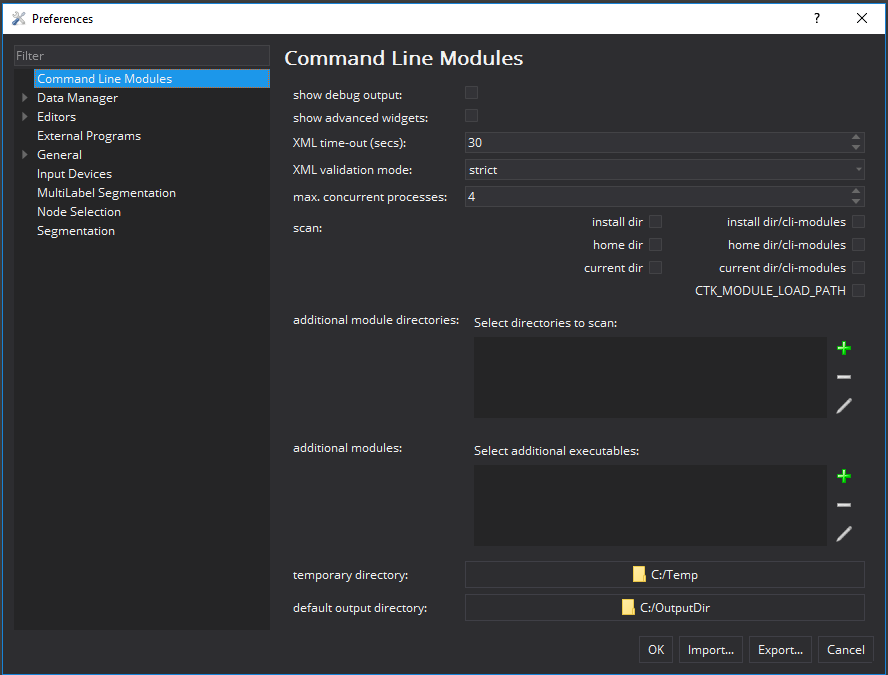
Each of these preferences is now explained in some detail.
- show debug output: If checked will output more messages to the console for debugging purposes.
- show advanced widgets: If selected, additional widgets appear in the front-end for advanced users.
- XML time-out (secs): Sets the time-out for the retrieval of the XML.
- XML validation mode: The user may select a different mode for XML validation. If this is changed, the application will need to be restarted. There are 3 modes available. If the user selects "strict" mode, the XML schema produced by the command line application must exactly conform to this definition. For "none", there will be no validation. For "weak" validation, the application will report errors, but try to carry on and load as many modules as possible. The XML validation errors are available as tool-tips on the tab widget when the module is launched. Many third party modules included with Slicer currently have incorrect XML (typically, mis-ordered XML tags), and so the "weak" or "none" mode may assist in loading them. By default the "weak" mode is chosen so that only valid modules are loaded.
- max concurrent processes: Sets the maximum number of concurrent jobs that can be run via this interface. The default is 4. When the maximum number is reached, the green "Run" button is disabled until a job finishes.
The next 7 preferences are to control where the view will search for valid command line programs. By default these are off as the searching process can take a long time and slow down the startup time of the GUI. The options provided are:
- scan installation dir: This is the directory where the actual application is stored.
- scan installation dir/cli-modules: Scans the sub-directory called cli-modules under the application installation directory.
- scan home dir: Scan the users home directory. (See QDir::homePath().)
- scan home dir/cli-modules: Scans the sub-directory called cli-modules under the users home directory.
- scan current dir: Scan the current working directory. (See QDir::homePath().)
- scan current dir/cli-modules: Scans the sub-directory called cli-modules under the current working directory.
- scan CTK_MODULE_LOAD_PATH: Scans the directory or list of directories defined by the environment variable CTK_MODULE_LOAD_PATH. A list is colon separated on Linux/Mac, and semi-colon separated on Windows.
In most cases, it is suggested that the user will leave these options unchecked, as the user can also specify custom directories, and even cherry-pick specific command line programs to load. Figure 2 shows a selection box that enables the user to specify custom directories to scan, and Figure 3. shows a selection box that enables the user to select specific modules. Picking specific directories, and specific executables will most likely make the application quicker to launch.
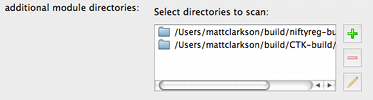
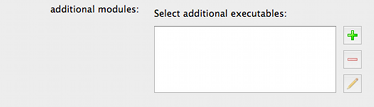
These directory and file selection boxes enable directories or files to be added, removed and updated in a similar fashion.
The user must make sure that the list of files selected in the "additional modules" section are not already contained within the directories specified in the "additional module directories" section.
In addition, the preferences page provides:
- temporary directory: Images stored in the DataManager are first written to a temporary folder as Nifti images before being passed to each command line program. This temporary directory will default to a platform specific temporary folder, but the user may select their preferred choice of temporary workspace.
Usage
When the view is launched, a simple interface is presented, as shown in Figure 4.
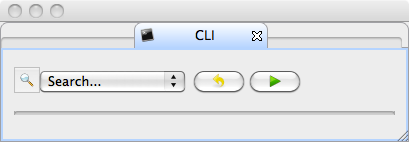
In this example, all the above check-box preferences were off, and the "additional module directories" was empty, and the "additional modules" list was empty so no command line applications were found. The "Search" box displays zero entries, and there is nothing to search.
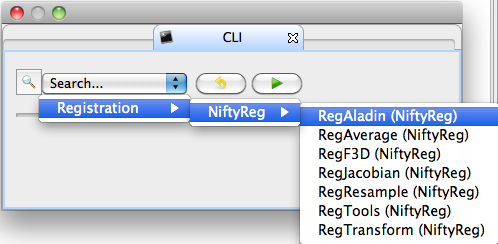
If the available search paths contain programs that are compatible (i.e. runnable) with this view, the name of the programs are displayed in the "Search" box in a nested menu, shown in Figure 5.
When a program is selected, the relevant interface is displayed, by default as collapsed group boxes to save space. Each section can be individually expanded if necessary to see the parameters.
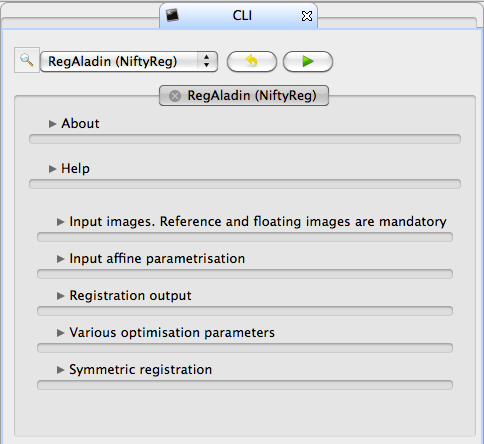
In this example, the parameters are displayed for NiftyReg produced at UCL, and more specifically for the affine registration program called RegAladin. The interface can contain a wide variety of controls. If a parameter for a command line program is an input image, then the widget displayed is linked to the DataManager, so that as new images are loaded, the correct image can be easily selected from the combo box.
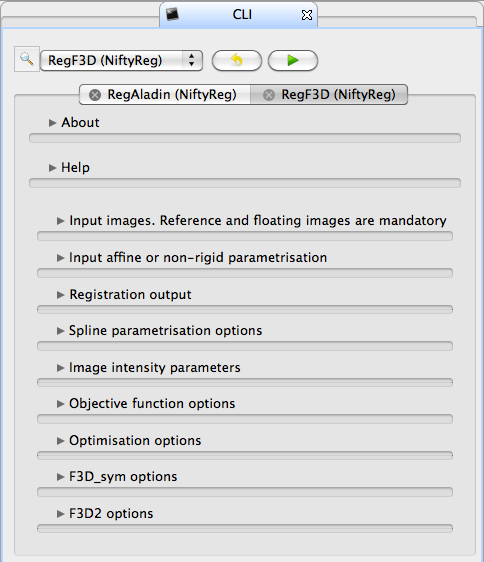
At this stage, multiple tabs can be opened, with one tab for each command line program. Figure 7 shows 2 tabs, for the RegAladin and RegF3D programs.
The main view provides some simple controls:
- Green arrow: Launch (run) the command line executable of the currently selected tab.
- Yellow undo arrow: Resets the GUI controls of the currently selected tab to default values, if and only if the original XML specified a default value.
At this stage, nothing has been launched. When the user hits the green arrow button, a job is launched. Each running job is shown as a new progress reporting widget under the main tabbed widget, as shown in Figure 8.
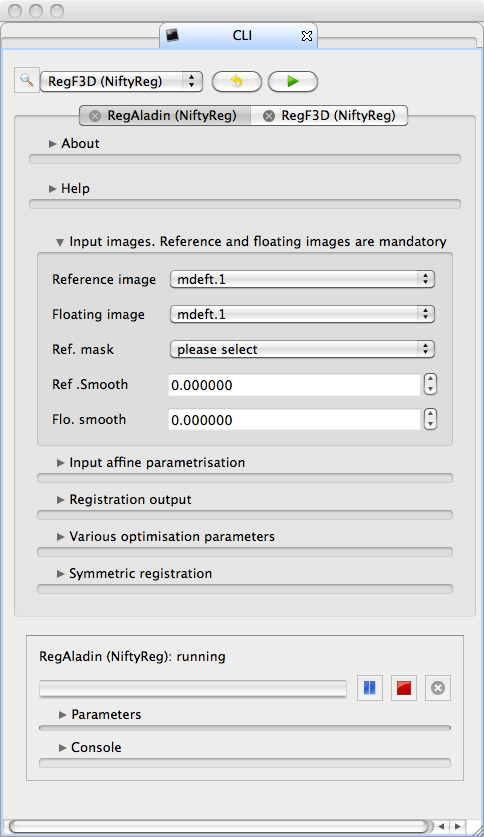
The controls for each running job are:
- Blue pause button: If supported on the host platform, this button will be enabled and can be toggled off (pause) or on (resume).
- Red square: If supported on the host platform, this button will kill the command line program.
- Black cross: Will remove the progress reporting widget from the GUI.
When the user hits the green arrow in the main view:
- The currently selected tab is designated the "current" job, and contains the "current" set of parameters.
- A new progress reporting widget is created.
- The current parameters are copied to the progress reporting widget. In Figure 8. a parameters section is visible, and by default is collapsed, as they are simply for referring back to.
- All the output for the command line program is shown in the console widget, with a separate console for each job.
- Each new progress reporting widget is simply stacked vertically (newest is top-most), and it is up to the user to delete them when they are finished.
It is easy to run multiple jobs. The green button simply launches the job corresponding to the current tab repeatedly. It is up to the user to make sure that any output file names are changed between successive invocations of the same command line module to avoid overwritting output data.
In addition, each set of parameters contains an "About" section containing details of the contributors, the licence and acknowledgements and also a "Help" section containing a description and a link to any online documentation.
These documentation features are provided by the developers of the third party plugin, and not by the host program. If information is missing, the user must contact the third party developers.
Technical Notes
From a technical perspective, the Command Line Modules View is a simple view, harnessing the power of the CTK command line modules framework. For technical information see the CTK wiki page and obviously the CTK code base.