Medical Imaging Interaction Toolkit  2016.11.0
Medical Imaging Interaction Toolkit
The Multilabel Segmentation View
multilabelsegmentation.png
html

Please reference The Segmentation Plugin for the description of the general segmentation tools.

Start Segmenting

To start using the Segmentation Perspective you will have to either create a new segmentation session or load an existing one from disk. The Segmentation toolbar collects buttons for the these actions:

org_mitk_views_multilabelsegmentationIMGtoolbar.png
Segmentation toolbar
  • Create segmentation session a new segmentation session is created.
  • Load segmentation session a segmentation session can be loaded from disk (.lset file extensions).
  • Save segmentation session the current segmentation session can be saved to disk.
  • Import segmentation session a segmentation session can be incorporated into the current one. All new labels will be appended at the end of the table.
  • Add label a new label is appended to the current segmentation session, at the end of the table.

The Label Table

The following label properties are readily available to modify:

  • Name the name of the label. Can be a predefined one or any other.
  • Color the color of the label.
  • Visible whether the label is currently visible or hiden.
  • Locked whether the label is locked or editable. A locked label cannot be overwritten by another.

The Label Table is shown below:

org_mitk_views_multilabelsegmentationIMGlabeltable.png
The <b>Label Table</b> showing all the labels in the current segmentation session

Creating a New Label

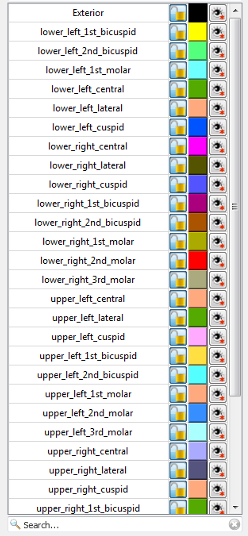
Click the "New Label" button to add a new label. A dialog will show-up to enter the name and color. Preset organ names and corresponding colors are offered while you type in, but you can set any name. The new name if not known will be automatically remembered and made available the next time you create a new label. In the current implementation of the plugin, the maximum number of labels is restricted to 255. If you need more, you will have to create a new segmentation session.

Creating a New Layer

A layer is a set of labels that occupy a non-overlapping anatomical space. The best way to describe them is by a real use case. Imagine you are working on a radiotherpay planning application. In the first layer of your segmentation session you would like to trace the contours of the liver and neighboring organs. You can accomodate all these segmentations in separate labels because they all occupy different anamical regions and do not overlap. Now say you would like to segment the arteries and veins inside the liver. If you donĀ“t trace them in a different layer, you will overwrite the previous ones. You may also need a third layer for segmenting the different irrigation territories in the liver and a fourth layer to contain the lession you would like to treat.

The next figure illustrates the Layer Manager . The buttons in it contained serve for adding a new layer, selecting the previous and the next one. The active layer is shown together with the buttons.

org_mitk_views_multilabelsegmentationIMGlayerManager.png
Correction Tool

Searching a Label

It may happen that many labels (e.g. > 200) are present in a segmentation session and therefore manual searching is time consuming. The Label Search edit box allows for quickly finding the label you want. Just start writing its name and and you will get assitance for completing its name. If the label you were searching is found, press enter and it will became the active one.

org_mitk_views_multilabelsegmentationIMGsearchlabel.png
Label search

Label Editing

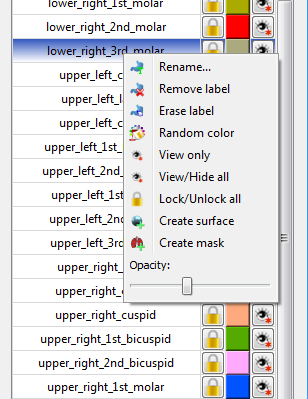
First of all, you have to select the active label by clicking on the corresponding row in the Label Table. Only one label can be active at the time. Then you can select an editing tool in the toolbox.

Operations on Labels

Depending on your selection in the Label Table , several actions are offered:

Single Label Selection

If you right click on any label in the table, a menu will pop-up offering the following actions to be performed on the selected label:

  • Rename... : change the name and/or color of the selected label.
  • Remove label : delete the selected label.
  • Erase label : only clear the contents of the selected label.
  • Random color : generate a surface mesh out of the selected label.
  • View only : generate a mask out of the selected label. A mask is a binary image with "1" inside and "0" outside.
  • View/Hide all : generate a mask out of the selected label. A mask is a binary image with "1" inside and "0" outside.
  • Lock/Unlock all : generate a mask out of the selected label. A mask is a binary image with "1" inside and "0" outside.
  • Create surface : generate a surface out of the selected label.
  • Create mask : generate a mask out of the selected label. A mask is a binary image with "1" inside and "0" outside.
org_mitk_views_multilabelsegmentationIMGLabelTableSingleSelectionContextMenu.png
Context menu for single label selection

Multiple Label Selection

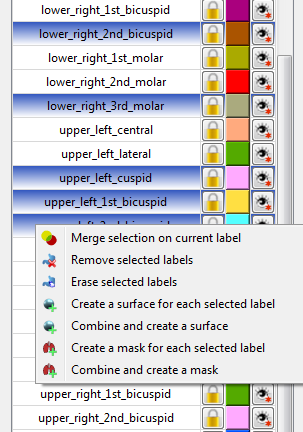
If more than one label is selected, a different menu will show up:

org_mitk_views_multilabelsegmentationIMGLabelTableMultipleSelectionContextMenu.png
Context menu for multiple label selection
  • Merge selection on current label : transfer the contents of the selected labels in the Label Table into the current one.
  • Remove selected labels : delete the selected labels.
  • Erase selected labels : only clear the contents of the selected labels.
  • Create a surface for each selected label : generate a surface mesh out of each selected label.
  • Combine and create a surface : generate a surface out of the combination of the selected labels.
  • Create a mask for each selected label : generate a mask out of each selected label. A mask is a binary image with "1" inside and "0" outside.
  • Combine and create a mask : generate a mask out of the combination of the selected labels.