|
Medical Imaging Interaction Toolkit
2016.11.0
Medical Imaging Interaction Toolkit
|
|
Medical Imaging Interaction Toolkit
2016.11.0
Medical Imaging Interaction Toolkit
|
The Datamanager is the central componenent to manage medical data like images, surfaces, etc.. After loading one or more data into the Datamanager the data are shown in the four-view window, the so called Standard View. The user can now start working on the data by just clicking into the standard view or by using the MITK-modules such as "Segmentation" or "Basic Image Processing".
There are three ways of loading data into the Datamanager as so called Data-Elements.
The user can just drag and drop data into the Datamanager or directly into one of the four parts of the Standard View. He can as well use the Open-Button in the right upper corner. Or he can use the standard "File->Open"-Dialog on the top.
A lot of file-formats can be loaded into MITK, for example
The user can also load a series of 2D images (e.g. image001.png, image002.png ...) to a MITK 3D volume. To do this, just drag and drop one of those 2D data files into the Datamanager by holding the ALT key.
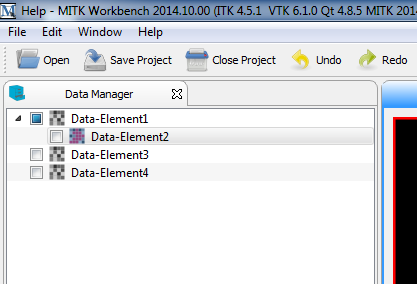
After loading one or more data into the Datamanager they appear as Data-Elements in a sorted list inside the Datamanager. Data-Elements can also be sorted hierarchically as a parent-child-relation. For example after using the Segmentation-Module on Data-Element1 the result is created as Data-Element2, which is a child of Data-Element1 (see Screenshot1). The order can be changed by drag and drop.
The listed Data-Elements are shown in the standard view. Here the user can scale or rotate the medical objects or he can change the cutting planes of the object by just using the mouse inside this view.
There are two ways of saving data from the Datamanger. The user can either save the whole project with all Data-Elements by clicking on "File"->"Save Project" or he can save single Data-Elements by right-clicking->"Save", directly on a Data-Element. When saving the whole project, the sorting of Data-Elements is saved as well. By contrast the sorting is lost, when saving a single Data-Element.
The Data-Elements are listed in the Datamanager. As described above the elements can be sorted hierarchically as a parent-child-relation. For example after using the Segmentation-Module on Data-Element1 the result is created as Data-Element2, which is a child of Data-Element1 (see Screenshot1). By drag and drop the sorting of Data-Elements and their hierarchical relation can be changed.
By default all loaded Data-Elements are visible in the standard view. The visibility can be changed by right-clicking on the Data-Element and then choosing "Toogle visibility". The box in front of the Data-Element in the Datamanager shows the visibility. A green-filled box means a visible Data-Element, an empty box means an invisible Data-Element (see Screenshot1).
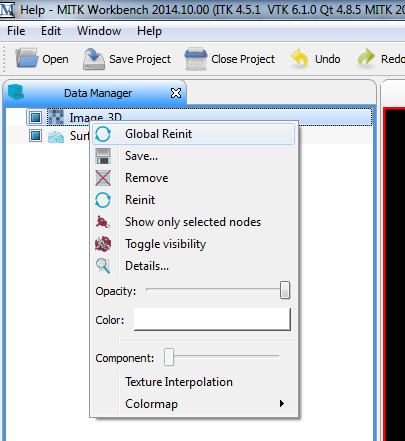
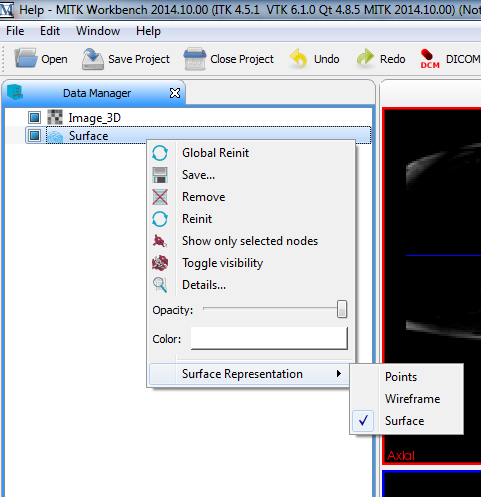
There are different types of representations how to show the Data-Element inside the standard view. By right-clicking on the Data-Element all options are listed (see Screenshot2 and Screenshot 3).
Global reinit updates all windows to contain all the current data:
Reinit updates a single data item and fits the windows to contain only this data item:
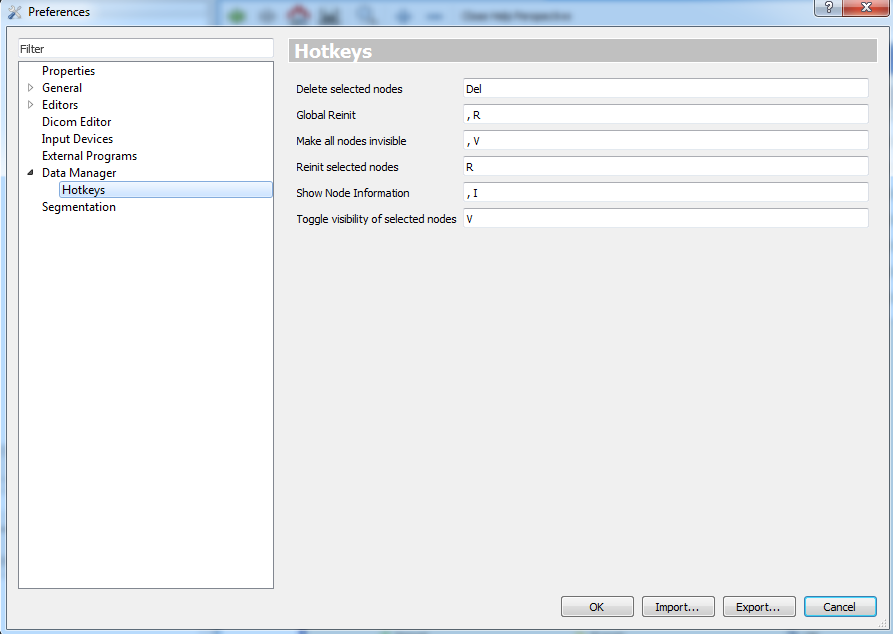
For the datamanager there are already some default hotkeys like the del-key for deleting a Data-Element. The whole list is seen in Screenshot4. From here the Hotkeys can also be changed. The preference page is found in "Window"->"Preferences".
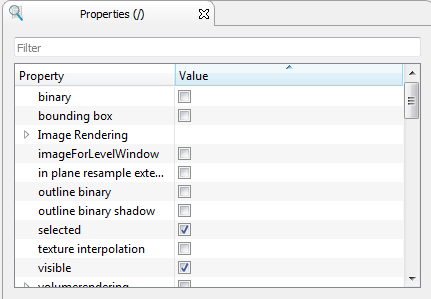
The Property List displays all the properties the currently selected Data-Element has. Which properties these are depends on the Data-Element. Examples are opacity, shader, visibility. These properties can be changed by clicking on the appropriate field in the "value" column.
 1.8.9.1
