
Icon of the DICOM Plugin
- Note
- This article requires a basic knowledge of the DICOM Standard.
Overview
The DICOM editor is an experimental editor which allows for loading of DICOM images as well as server communication. It features a highly experimental query/retrieve (you need to configure your PACS correspondingly) as well as a DICOM browser. The DICOM browser allows you to navigate the DICOM folder/cd depending on its metadata (patient/study/series) and import selected series for viewing in your MITK based application. It also allows you to store your dicom data in an internal database so you can easily access often used dicom images.
It is based on the commonTK (CTK) DICOM funcionality.
Data handling

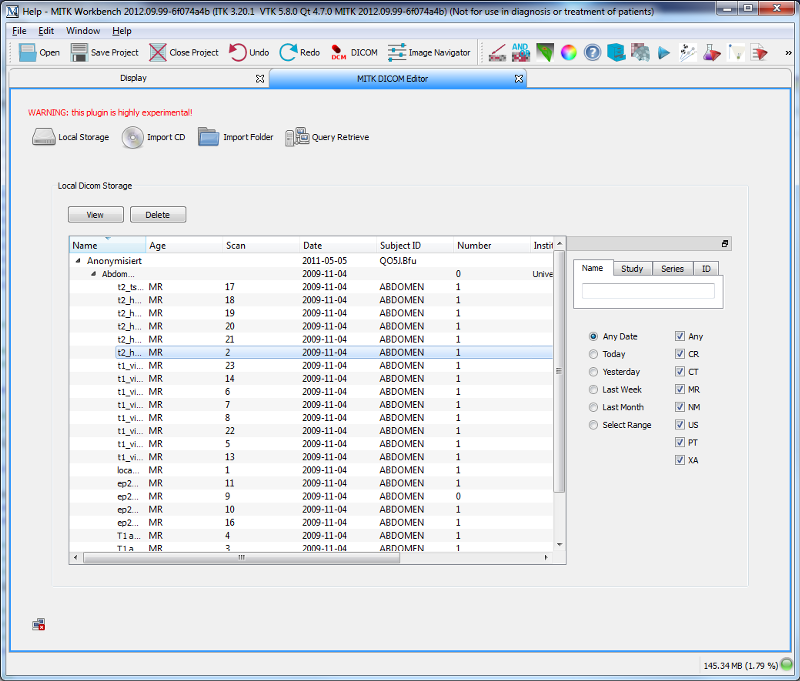
The dicom Plugin controls
In the image above you see the start page of the dicom plugin. On top of the start page you see four buttons. The Local Storage, the Import CD, the Import Folder and the Query Retrieve button. If you press one of these buttons, the dicom plugin will switch to your local dicom image storage or will start importing dicom images from CD or a folder on your hard drive or it will open the query retrieve screen.
-
Click the 'Local Storage' button to open the local storage screen.
-
Click the 'Import CD' button to import DICOM data from a CD.
-
Click the 'Import Folder' button to import DICOM date from a directory.
-
Click the 'Query Retrieve' button to open the query retrieve screen.
Data storage
The DICOM data storage
If you open the dicom plugin the dicom data storage will be displayed. You are able to see all your stored dicom image data. You can browse your data by clicking on the left arrow beside the name of your data. There are three levels available. The first level is the patient level where you can see the patient data. On the second level you can see the dicom studies for the patient. on the third level you can see all available series refering to it's study. You can delete the data by selecting it and pressing the delete button. Be careful if you have selected a patient or a study all refering data be deleted. So if you delete a patient the patient and all studies and series refered to the patient will be deleted. If you delete a study all series of the study will be deleted. If you want to view the dicom data you have to select a series and click on the View button. The data will appear in the DataManager and will be dispayed.
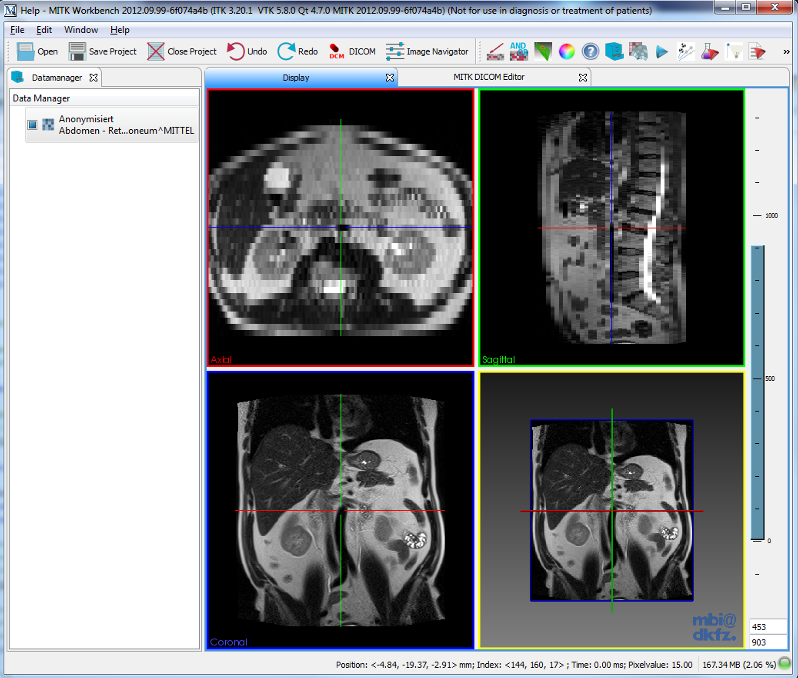
Viewed image
-
Click on the arrow on the left of your data to expand or hide dicom data levels.
-
Click the 'Delete' button to delete selected DICOM data.
-
Click the 'View' button to view DICOM data.
Data import
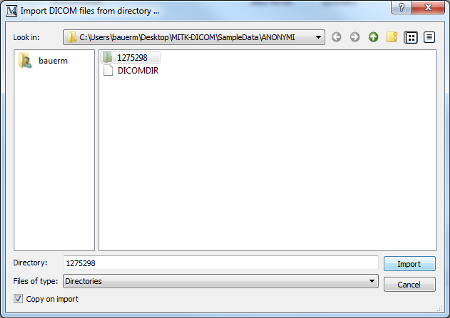
The import dialog checked
There are two diffrent ways to import DICOM data. The First one is to directly imort it into your DICOM data storage. To achieve this you should toggle the checkbox 'Copy on import'. The second approach is, to have a look at the data first before importing it. To do that you simply don't check 'Copy on import'. This will leed you to the leed you to the 'External Dicom Data' screen which provides you a preview of the data containing in youre choosen folder. You can import the data here by selecting it and pressing the 'Download' button. It is also possible to view DICOM series directly in Mitk by selecting it here and pressing the 'View' button.
-
Click 'Import Folder' or 'Import CD' button to open the import dialog.
-
Enable the 'Copy on import' checkbox and choose a folder to import into data storage directly.
-
Disable the 'Copy on import' checkbox to get to the 'External Dicom Data' screen.
-
Click on the arrow on the left of your data to expand or hide dicom data levels.
-
Click the 'Download' button to download selected DICOM data to your DICOM data storage.
-
Click the 'View' button to view DICOM data.
Query/Retrieve
- Warning
- This plugin is experimental and not all of the described features behave as expected.
- Note
- The query retrieve plugin only works if the PACS you are calling knows your machine settings. There are also issues when you are running a firewall.
The query retrieve workflow allows you to get DICOM data from a server.
The query retrieve screen
Query
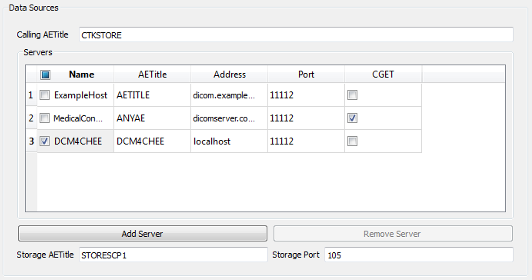
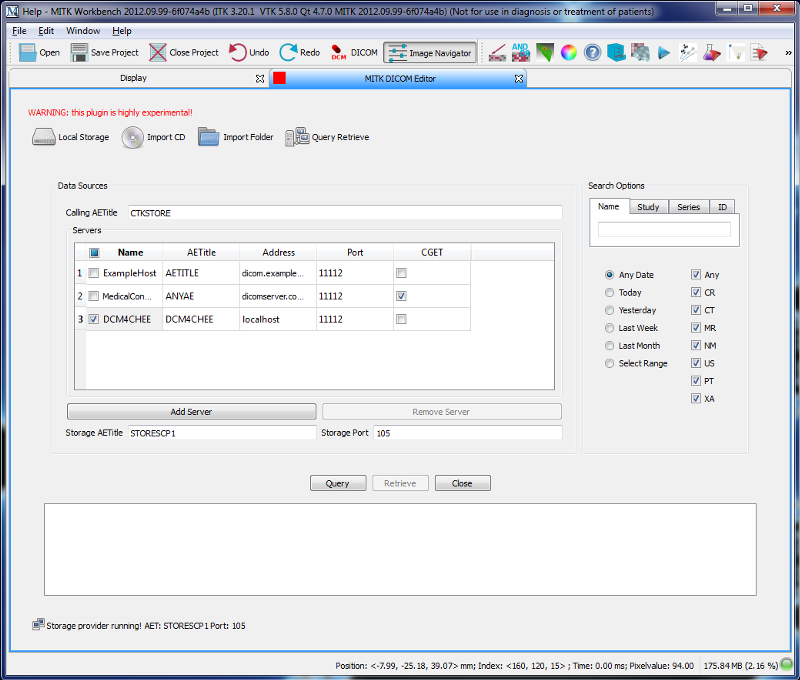
The DICOM network configuration
By performing a DICOM query you will ask a server for it's DICOM data. This requires to setup the DICOM network configuration of your system and the server. By clicking on 'Add Server' a new plain server field will appear. Now you can give it a name of your choice. Fill the servers "DICOM name" the AETitle. Type in it's url, it's port and the specific DICOM protocoll you want to use for image transfer.
- Note
- I recommend not to use CGET because most of the PACS systems (Image Servers) don't support that protocoll.
You can configure the DICOM network configuration of your machine by editing the 'Calling AETiltle', the 'Storage AETitle' and The 'Storage Port' text fields. But normaly you don't have to change your configuration.
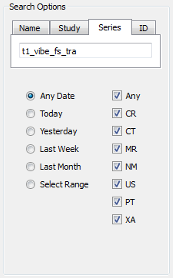
The DICOM search options
After you have finished your network configuration and before you start the query you should use the 'Search Options' to specify your query. Otherwise all data on the server will be queried and you will have to wait for a long time. You can specify your query by searching for a specific patient name or a study or a serie or a specific DICOM object by it's id. You are allowed to include or exclude DICOM modalities from your query and you can specify a specific time in which the DICOM images you are searching fo might been captured. When you finished that you can click the query button and the queried DICOM data will appear.
-
Click on the 'Add Server' button.
-
Edit 'Name' field.
-
Edit 'AETitle' field.
-
Edit 'Adress' field.
-
Edit 'Port' field.
-
Set search options.
-
Click on 'Query' button.
Retrieve

The queried DICOM data.
After the query you are able to select the queried data and click the 'Retrieve' button. This will store the queried DICOM data into your DICOM storage. Click on the 'Local Storage' button and work with your new data.
-
Click on the 'Retrieve' button to retrieve the data to your DICOM storage.
-
Click on the 'Local Storage' button.
 1.8.9.1
