Medical Imaging Interaction Toolkit  2016.11.0
Medical Imaging Interaction Toolkit
IGT filter pipeline

The IGT tutorial consists of four main parts for construction of a small navigation pipeline using a virtual tracking device. The virtual tracking device produces random tool data (position and orientation) so no additional hardware is required. The full code of this small navigation pipeline included in this tutorial can be found in MITK-Source/Modules/IGT/Tutorial/mitkIGTTutorialStep1.cpp. At the very end of this page, you can find build instructions on how to run this example on your computer.

//*************************************************************************
// What we will do...
//*************************************************************************
//In this tutorial we build up a small navigation pipeline with a virtual tracking device
//which produce random positions and orientation so no additional hardware is required.
//
//The source of the pipeline is a TrackingDeviceSource object. This we connect to a simple
//filter which just displaces the positions with an offset. After that we use a recorder
//to store this new positions and other information to disc in a XML file. After that, we use
//another source (NavigationDataPlayer) to replay the recorded data.

Tracking Layer

Firstly a new object "tracker" of the type mitk::VirtualTrackingDevice is created, then two tools, named "tool1" and "tool2", are added to this tracker. Since the tracking device "tracker" is treated as a virtual tracking device, tool1 and tool2 are just added to the object by method AddTool(name) and don't need further specification (e.g. real tools might need a calibration file).

//*************************************************************************
// Part I: Basic initialization of the source and tracking device
//*************************************************************************
//First of all create a tracking device object and two tools for this "device".
//Here we take the VirtualTrackingDevice. This is not a real tracking device it just delivers random
//positions and orientations. You can use other/real tracking devices if you replace the following
//code with different tracking devices, e.g. mitk::NDITrackingDevice. The tools represent the
//sensors of the tracking device. The TrackingDevice fills the tools with data.
std::cout << "Generating TrackingDevice ..." << std::endl;
tracker->AddTool("tool1");
tracker->AddTool("tool2");

Navigation Layer

IGTTutorialStep1.png

Secondly, a new source of the type mitk::TrackingDeviceSource has to be created with outputs for each single tool of a tracker. The source sets the following tracking device by using method SetTrackingDevice as shown below. So now, the source is initialized with the virtual tracking device. Next, the source is connected and tracking is started.

//The tracking device object is used for the physical connection to the device. To use the
//data inside of our tracking pipeline we need a source. This source encapsulate the tracking device
//and provides objects of the type mitk::NavigationData as output. The NavigationData objects stores
//position, orientation, if the data is valid or not and special error informations in a covariance
//matrix.
//
//Typically the start of our pipeline is a TrackingDeviceSource. To work correct we have to set a
//TrackingDevice object. Attention you have to set the tools before you set the whole TrackingDevice
//object to the TrackingDeviceSource because the source need to know how many outputs should be
//generated.
std::cout << "Generating Source ..." << std::endl;
source->SetTrackingDevice(tracker); //here we set the device for the pipeline source
source->Connect(); //here we connect to the tracking system
//Note we do not call this on the TrackingDevice object
source->StartTracking(); //start the tracking
//Now the source generates outputs.

In part II, a displacemt filter (object "displacer") is constructed to change the positions of the filtered NavigationData objects with an offset for each direction (X,Y,Z). The given filter has inputs and outputs for each tool, in this example we have two tools. Hence, there exist two inputs and outputs. Every output of the displacement filter object is connected to the recorder object in the next part.

//*************************************************************************
// Part II: Create a NavigationDataToNavigationDataFilter
//*************************************************************************
//The next thing we do is using a NavigationDataToNavigationDataFilter. One of these filter is the
//very simple NavigationDataDisplacementFilter. This filter just changes the positions of the input
//NavigationData objects with an offset for each direction (X,Y,Z). The input of this filter is the
//source and the output of this filter is the "displaced" input.
std::cout << "Generating DisplacementFilter ..." << std::endl;
mitk::FillVector3D(offset, 10.0, 100.0, 1.0); //initialize the offset
displacer->SetOffset(offset); //now set the offset in the NavigationDataDisplacementFilter object
//Connect the two filters. You can use the ConnectTo method to automatically connect all outputs from one filter
// to inputs from another filter.
displacer->ConnectTo(source.GetPointer());
// Alternatively, you can manually connect inputs and outputs.
// The code below shows what the ConnectTo Methods does internally:
//
//for (unsigned int i = 0; i < source->GetNumberOfOutputs(); i++)
//{
// displacer->SetInput(i, source->GetOutput(i)); //here we connect to the displacement filter
//}

Record Navigation Data

In part III, all the NavigationData is recorded with the NavigationDataRecorder. In order to record, we simply create an object "recorder" of the type mitk::NavigationDataRecorder and set the appropriate file to it. Now the displacer object is connected to the recorder object, the method StartRecording() is called on the next line. Afterwards, the recorder has to be updated a couple of times. In this example the recorder is updating 100 times through a for-loop statement. This can also be seen as a simulation of a timer by using a for-loop.

//*************************************************************************
// Part III: Record the data with the NavigationDataRecorder
//*************************************************************************
//The next part of our pipeline is the recorder. The input of the recorder is the output of the displacement filter
//and the output is a XML file with the name "Test Output-0.xml", which is written with a NavigationDataSetWriter.
std::cout << "Start Recording ..." << std::endl;
//we need the stringstream for building up our filename
std::stringstream filename;
//the .xml extension and an counter is NOT added automatically anymore -- that was the case in an earlier version
filename << itksys::SystemTools::GetCurrentWorkingDirectory() << "/Test Output-0.xml";
std::cout << "Record to file: " << filename.str() << " ..." << std::endl;
//now the output of the displacer object is connected to the recorder object
recorder->ConnectTo(displacer);
recorder->StartRecording(); //after finishing the settings you can start the recording mechanism
//now every update of the recorder stores one line into the file for
//each added NavigationData
for (unsigned int x = 0; x < 100; x++) //write 100 datasets
{
recorder->Update(); //the update causes one line in the XML file for every tool
//in this case two lines
itksys::SystemTools::Delay(100); //sleep a little
}
recorder->StopRecording(); //to get proper XML files you should stop recording
//if your application crashes during recording no data
//will be lost it is all stored to disc
//The IO-System needs a filename. Otherwise the output
//is redirected to the console. See MITK-Concepts page for more details on IO in MITK
mitk::IOUtil::SaveBaseData(recorder->GetNavigationDataSet(), filename.str());

Play Navigation Data

Part IV explains how the recoded file can be played for further use. After the object "player" of a type mitk::NavigationDataSequentialPlayer is created, the required file has to be set to the player and playing has to be started. Here, there exists a new pipeline which functions by reading the recorded file from the harddisc and plays it by using the player as source. During the play, the for-loop makes the file update as in part III.
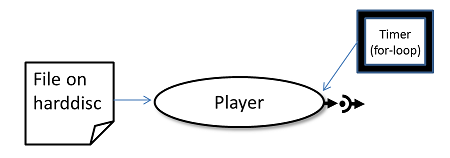
IGTTutorialStep1-2.png
//*************************************************************************
// Part IV: Play the data with the NavigationDataSequentialPlayer
//*************************************************************************
//The recording is finished now so now we can play the data. The NavigationDataPlayer is similar
//to the TrackingDevice source. It also derives from NavigationDataSource. So you can use a player
//instead of a TrackingDeviceSource. The input of this player is a NavigationDataSet, which we
//read with a NavigationDataReader.
std::cout << "Start playing from file: " << filename.str() << " ..." << std::endl;
mitk::NavigationDataSet::Pointer naviDataSet = dynamic_cast<mitk::NavigationDataSet*> (mitk::IOUtil::LoadBaseData(filename.str()).GetPointer());
player->SetNavigationDataSet(naviDataSet);
//From now on, the player provides NavigationDatas in a sequential order. The next position is given, as soon as "update" is called, so this player is not in real time.
//If you need the correct time of your tracking Data, use the NavigationDataPlayer instead and call "StartPlaying" and "StopPlaying".
//this connects the outputs of the player to the NavigationData objects
mitk::NavigationData::Pointer nd = player->GetOutput();
mitk::NavigationData::Pointer nd2 = player->GetOutput(1);
for (unsigned int x = 0; x < 100; x++)
{
if (nd.IsNotNull()) //check if the output is not null
{
//With this call, we go to the next recorded data set.
player->GoToNextSnapshot();
MITK_INFO << "Time Step " << x;
MITK_INFO << "Tool 1:" << nd->GetPosition();
MITK_INFO << "Tool 2:" << nd2->GetPosition();
itksys::SystemTools::Delay(100); //sleep a little like in the recorder part, just for nice reading...
}
}
itksys::SystemTools::Delay(2000);
std::cout << "finished" << std::endl;

IGT Example Build Instructions

This tutorial is an extra target which can be build separately. Make sure, you selected the Navigation option in cmake during your superbuild (set MITK_BUILD_CONFIGURATION to mitkNavigation modules) or select the MITK_BUILD_org.mitk.gui.qt.igtexamples on your MITK-build and make sure that all dependencies are build.

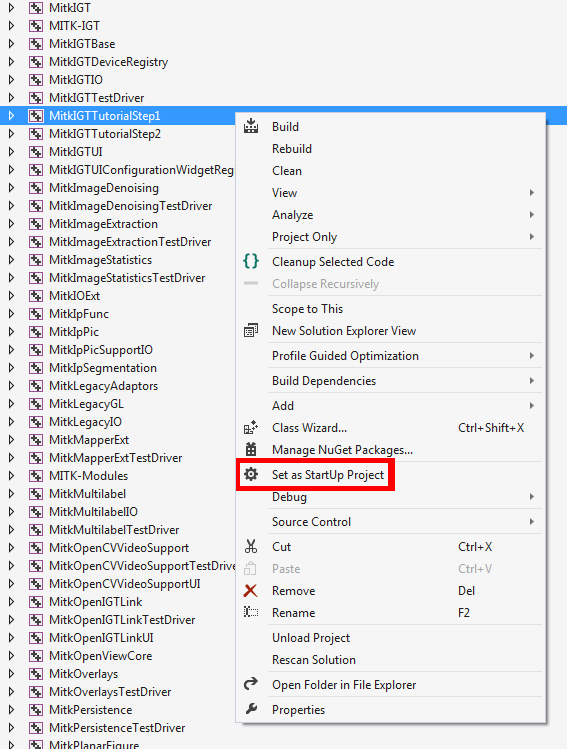
Visual Studio: Right click in your solution explorer on MITKIGTTutorialStep1 –> Set as start up project –> build & Start without debugging. A new window will open.
IGTTutorialStep1_buildInstrWindows.png

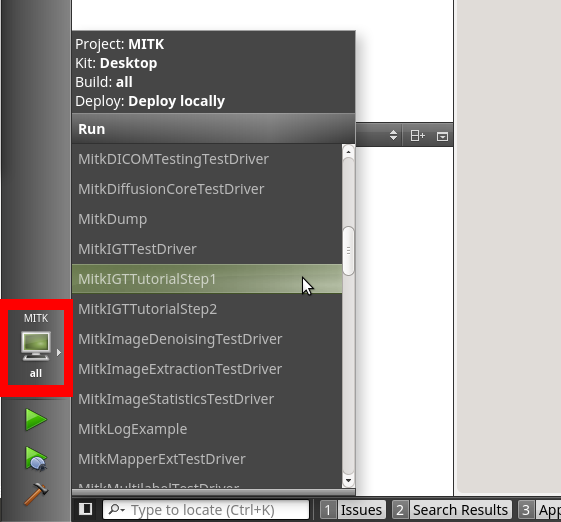
Qt creator: Select MITKIGTTutorialStep1 as Project (see screenshot below) and build and run the project. The output can be found in the QT creator console.
IGTTutorialStep1_buildInstrLinux.png

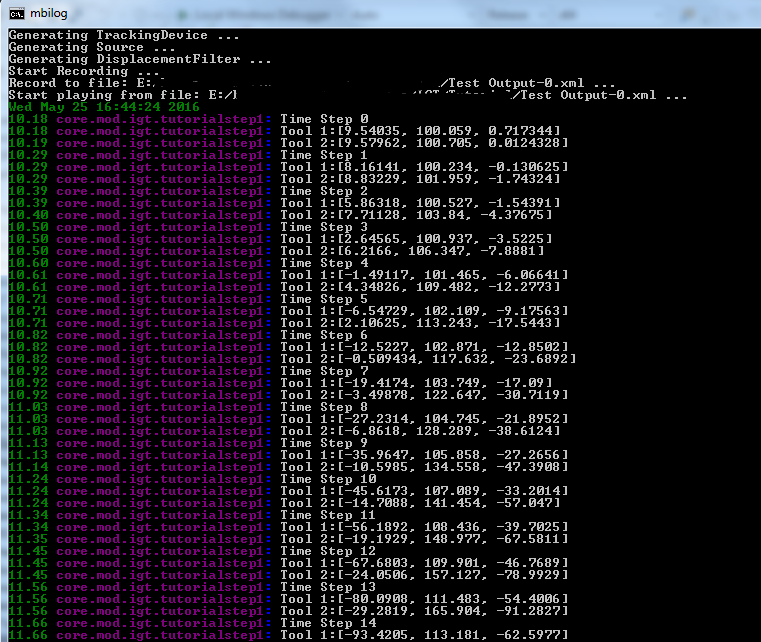
Your output should look similar to this:
IGTTutorialStep1_output.png

Return to the [IGT Tutorial Overview]