Table of Contents
General remark on F1 help
This is the help window of the standard display. To display the help windows of other plugins, press F1 when the plugin of interest is active (please make sure the tab of the plugin of interest is highlighted). Alternatively, go to the Help menu and select Open Help Perspective. A help window opens from which you can select the documentation of the plugin of interest.
Four Window View
Overview
The four window view is the heart of the MITK image viewing. The standard layout is three 2D windows and one 3D window, with the axial window in the top left quarter, the sagittal window in the top right quarter, the coronal window in the lower left quarter and the 3D window in the lower right quarter. The different planes form a crosshair that can be seen in the 3D window.
Once you select a point within the picture, information about it is displayed at the bottom of the screen.
Navigation
Left click in any of the 2D windows centers the crosshair on that point. Pressing the right mouse button and moving the mouse zooms in and out. By scrolling with the mouse wheel you can navigate through the slices of the active window and pressing the mouse wheel while moving the mouse pans the image section.
In the 3D window you can rotate the object by pressing the left mouse button and moving the mouse, zoom either with the right mouse button as in 2D or with the mouse wheel, and pan the object by moving the mouse while the mouse wheel is pressed. Placing the cursor within the 3D window and holding the "F" key allows free flight into the 3D view.
Customizing
By moving the cursor to the upper right corner of any window you can activate the window menu. It consists of three buttons.
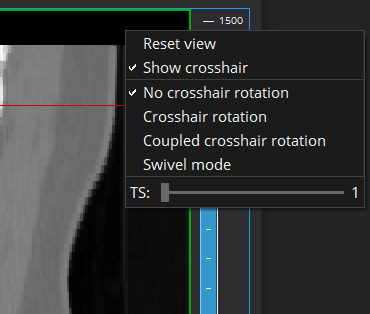
The crosshair button allows you toggle the crosshair, reset the view and change the behaviour of the planes.
Activating either of the rotation modes allows you to rotate the planes visible in a 2D window by moving the mouse cursor close to them and click and dragging once it changes to indicate that rotation can be done.
The swivel mode is recommended only for advanced users as the planes can be moved freely by clicking and dragging anywhere within a 2D window.
The middle button expands the corresponding window to fullscreen within the four window view.
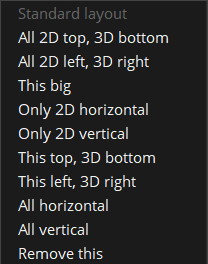
The right button allows you to choose between many different layouts of the four window view to use the one most suited to your task.
Levelwindow
Once an image is loaded the levelwindow appears to the right hand side of the four window view. With this tool you can adjust the range of grey values displayed and the gradient between them. Moving the lower boundary up results in any pixels having a value lower than that boundary to be displayed as black. Lowering the upper boundary causes all pixels having a value higher than it to be displayed as white.
The pixels with a value between the lower and upper boundary are displayed in different shades of grey. This way a smaller levelwindow results in higher contrasts while cutting off the information outside its range whereas a larger levelwindow displays more information with a higher detail level at the cost of contrast.
You can pick the levelwindow with the mouse to move it up and down, while moving the mouse cursor to the left or right to change its size. Picking one of the boundaries with a left click allows you to change the size symmetrically. Holding CTRL and clicking a boundary adjusts only that value.
With line edit fields below you can directly adjust the levelwindow. The upper field describes the center of the levelwindow, the bottom the span of the window around the center. By selecting one of fields and typing any number you can set these two parameters.